Sorry, I have been at it again.
I have uploaded a HO NSWR 'Cheap' Signal Box to my Signals Branch Shapeways Shop. The 'Cheap' Signal Box was exactly that, a smaller cheaper signal box than the Standard Platform Level Signal Box that I have already done. It was 10 feet square, had a plank door, no front window, a window on either end and wasn't lined inside.
The dimensions and information were sourced from the Data Sheet S3 Plan and from a plan and information in an article by James McInerney on Building Wooden Signal Boxes in the December 1986 Australian Model Railway Magazine (Issue 141 Vol.12 No. 12). The model signal box in this article was built by James and resides on my Bylong layout at Cox's Gap loop.
The walls and roof of the signal box are one piece and it is available in either White Strong and Flexible or in the Frosted Ultra Detail acrylic material.
A set of detail parts (windows, door, gutter and downpipe) needs to be ordered as well, these are in Frosted Ultra Detail.
7mm Scale NSWR Standard Platform Level Signal Box
As it seemed a logical thing to do I have also uploaded left hand and right hand door versions of the Standard Platform Level Signal Box in 7mm Scale. Perhaps someone might find it useful, they can be found in the 7mm Scale section of my shop.
The Signal box must be ordered in two parts, the walls and roof in White Strong and Flexible material and the Detail Parts also in White Strong and Flexible material. The Frosted Ultra Detail acrylic material is way too expensive for 7mmScale.
The above 3D render has a paneled door but the more standard door with the window is included in the detail parts.
N Scale NSWR Standard Platform Level Signal Box
While I was 'on a roll' I did the Standard Platform Level Signal Box for N Scale and both walls/roof and the detail parts are in Frosted Extreme Detail. These can be found in the N Scale - Other section of my shop.
Frosted Extreme Detail is the same acrylic material but the layer thickness printed is 16 microns compared to 29 microns for Frosted Ultra Detail ( one micron is 1/1000th of a millimeter).
Thursday, December 29, 2016
Tuesday, December 20, 2016
Merry Christmas and Happy New Year
Christine and I would like to take this opportunity to wish everyone a "Merry Christmas and a Happy New Year".
I would also like to give a big thank you to those modellers who bought items from my Signals branch shop over the past year and particularly during the recent 25% off sale from Shapeways.
Once again I am going to post about my recent 3D printing efforts and I hope that this isn't too annoying or boring. I will try to return soon to more posts about my Bylong layout and the related things that I have been doing.
Here are the most recent additions:
NSWGR Platform Level Signal Box
This is a rusticated weatherboard platform level signal box 17 feet 8 inches long that has been designed based on the signal box once at Kankool. The Greg Edwards S3 Data Sheet was used for dimensions along with photographs of Kankool signal box. The door of this signal box is at the left hand end as per Kankool.
A set of detail parts in Frosted Ultra Detail acrylic material is required to complete this signal box. Included in the detail parts are two different doors, windows, water tank, downpipe, gutter and a timber beam fitted with 8 electrical insulators.
There is a Left Hand Detail Set with the correct left hand doors, it is about where the hinges and door knobs are and that the door would be hinged on the end wall.
The walls and roof are one piece in the White Strong and Flexible (WSF) material that has a fine 'sandy' surface that needs to be sprayed with several coats of Auto Primer Filler or Auto Spray Putty and then rubbed back with about 1500 grit Wet and Dry paper to smooth the surface. It is up to the modeller to sand between coats or after several coats. Be careful not to sand the any detail away, particularly the corrugations in the roof. The corrugations could be brushed along their length while the paint is wet to stop the corrugations from filling with paint.
There is also walls and roof available in Frosted Ultra Detail which only needs to be rinsed in some acetone for a couple of minutes prior to painting. This is to remove any last traces of the waxy support material from the printing process.
Paint with the final colours either in the NSWGR 'Stone' colour scheme or the later pastel colour scheme (usually pale green blue or cream with white trim).
Please note that the model pictured is the WSF version and it has only has one coat of primer followed by the final colours to depict a perhaps more 'normally' finished model and not the multiple coats of primer and rubbing back to smooth the surface that some modellers may do.
The signal box is also available with the door at the right hand end and a right hand set of details parts are available for this signal box.
A pair of small water tanks with downpipes from this detail set is also available separately.
Early NSWGR Rivetted Water Tank
The rivetted water tank consists of the four water tank sides printed as one piece. The interior flanges and bolts have been included in the print.
A ledge has been printed inside the tank for a 3mm thick floor, layers of polystyrene or 3mm MDF would be suitable. Measure the underside of the tank for the floor, it should be 88.5mm x 88.5mm.
The tank is printed in the White Strong and Flexible (WSF) material which has a fine 'sandy' surface that needs to be sprayed with several coats of Auto Primer Filler or Auto Spray Putty and then rubbed back with about 1500 grit Wet and Dry paper to smooth the surface. It is up to the modeller to sand the flat areas between coats or after several coats. Be careful not to sand the rivets.
The water tank pictured is sitting on a Laser Rail Bits timber stand kit. An alternative would be the Models 'N More version.
Please note that the model pictured has only has one coat of primer followed by the final colours to depict a perhaps more 'normally' finished model and not the multiple coats of primer and rubbing back to smooth the surface that some modellers may do.
Recently released is a steam dome for the Eureka Models NSWGR D50 Class steam locomotive along with a Eureka Models replacement D50 funnel and dome set.
Also recently released are NSWGR C32 and Standard Goods (D50, D53 and D55 Class) funnels and steam dome sets with 1/8th inch mounting pegs that can be used to upgrade a DJH model locomotive or perhaps an early brass model.
These have been released in both HO and 7mm Scale.
The detail advantage of the 3D printed funnels is that they have the bolts on the flange holding the funnel to the smokebox of the locomotive. It is not possible to have the bolt heads on injection moulded funnels as the funnel would not be able to be removed from the moulding die. The only other way to get the bolts on the model funnel is to split the funnel into two parts as per the Ixion C32 which then leaves a fine groove/line at the join.
Lastly for those who model in N Scale (1:160) I have C32 and D50 funnel and steam dome sets available.
I would also like to give a big thank you to those modellers who bought items from my Signals branch shop over the past year and particularly during the recent 25% off sale from Shapeways.
Once again I am going to post about my recent 3D printing efforts and I hope that this isn't too annoying or boring. I will try to return soon to more posts about my Bylong layout and the related things that I have been doing.
Here are the most recent additions:
NSWGR Platform Level Signal Box
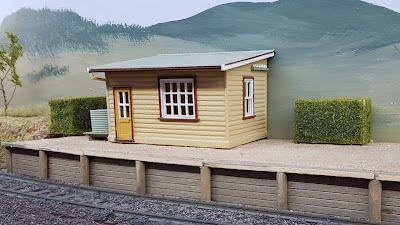 |
| Platform Level Signal Box NOTE: Camera lens distortion evident here, it is not the signal box |
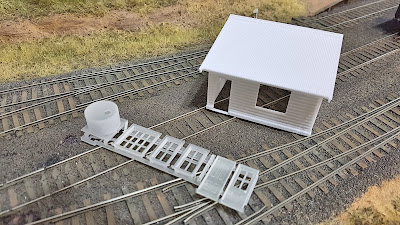 |
| Platform Level Signal Box 3D Printed Parts |
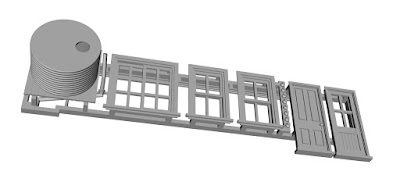 |
| Signal Box Left Hand Door Detail Set |
The walls and roof are one piece in the White Strong and Flexible (WSF) material that has a fine 'sandy' surface that needs to be sprayed with several coats of Auto Primer Filler or Auto Spray Putty and then rubbed back with about 1500 grit Wet and Dry paper to smooth the surface. It is up to the modeller to sand between coats or after several coats. Be careful not to sand the any detail away, particularly the corrugations in the roof. The corrugations could be brushed along their length while the paint is wet to stop the corrugations from filling with paint.
There is also walls and roof available in Frosted Ultra Detail which only needs to be rinsed in some acetone for a couple of minutes prior to painting. This is to remove any last traces of the waxy support material from the printing process.
Paint with the final colours either in the NSWGR 'Stone' colour scheme or the later pastel colour scheme (usually pale green blue or cream with white trim).
Please note that the model pictured is the WSF version and it has only has one coat of primer followed by the final colours to depict a perhaps more 'normally' finished model and not the multiple coats of primer and rubbing back to smooth the surface that some modellers may do.
The signal box is also available with the door at the right hand end and a right hand set of details parts are available for this signal box.
A pair of small water tanks with downpipes from this detail set is also available separately.
 |
| Small Water Tanks from Signal Box Detail Parts |
 |
| Rivetted Water Tank front view |
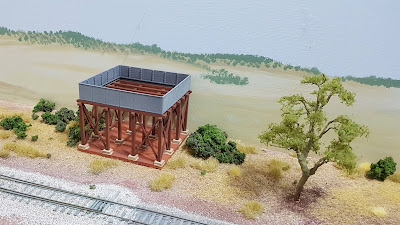 |
| Rivetted Water Tank showing bolted flanges on inside. |
A ledge has been printed inside the tank for a 3mm thick floor, layers of polystyrene or 3mm MDF would be suitable. Measure the underside of the tank for the floor, it should be 88.5mm x 88.5mm.
The tank is printed in the White Strong and Flexible (WSF) material which has a fine 'sandy' surface that needs to be sprayed with several coats of Auto Primer Filler or Auto Spray Putty and then rubbed back with about 1500 grit Wet and Dry paper to smooth the surface. It is up to the modeller to sand the flat areas between coats or after several coats. Be careful not to sand the rivets.
The water tank pictured is sitting on a Laser Rail Bits timber stand kit. An alternative would be the Models 'N More version.
Please note that the model pictured has only has one coat of primer followed by the final colours to depict a perhaps more 'normally' finished model and not the multiple coats of primer and rubbing back to smooth the surface that some modellers may do.
Recently released is a steam dome for the Eureka Models NSWGR D50 Class steam locomotive along with a Eureka Models replacement D50 funnel and dome set.
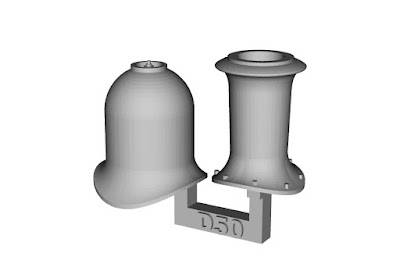 |
| Eureka Models NSWGR D50 Funnel and Steam Dome set |
These have been released in both HO and 7mm Scale.
 |
| C32 Funnel and Steam Dome - Standard means HO 1/8 inch and 7 mm Scale 1/4 inch mounting peg |
 |
| Standard Goods (D50, D53 and D55 Class) Funnel and Steam Dome set |
The detail advantage of the 3D printed funnels is that they have the bolts on the flange holding the funnel to the smokebox of the locomotive. It is not possible to have the bolt heads on injection moulded funnels as the funnel would not be able to be removed from the moulding die. The only other way to get the bolts on the model funnel is to split the funnel into two parts as per the Ixion C32 which then leaves a fine groove/line at the join.
Lastly for those who model in N Scale (1:160) I have C32 and D50 funnel and steam dome sets available.
 |
| N Scale C32 Funnel and Dome set |
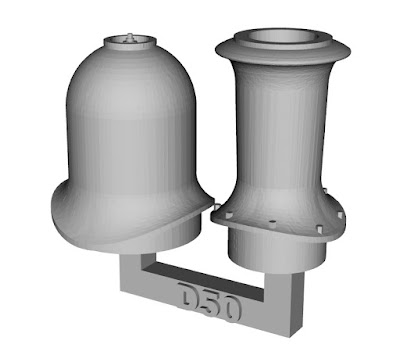 |
| N Scale Standard Goods (D50, D53 and D55 Class) Funnel and Dome set |
Subscribe to:
Posts (Atom)


