Monday, December 31, 2012

Happy New Year and a non-Bylong post

I recently came across an old VHS tape I had made of the Beyond Buliac layout which was shown at a Modelling the Railways of NSW convention in 1994.

The original was taken on a Sony Video 8 Handicam so the resolution isn't great and since I have a bit of conversion hardware I thought that those who didn't get to see it might enjoy my little video.

I had only just got the Handycam so I have to apologise for not turning the date off. Interestingly it does disappear during the video but then comes back again, more proof that I didn't know what I was doing.

Anyway, enjoy.


Happy New Year....

Thursday, December 20, 2012

Have a Merry Christmas and a Happy New Year

Chris and I would like to wish everyone a merry Christmas and a happy and safe New Year.


And for a bit of fun, here are a few Christmas 'presents'.


I must apologise for the poor focus on the train, I just got carried away with the particle effects in the CyberLink PowerDirector 11 Ultra program I just purchased. I will have to set up a suitable shot and try again.


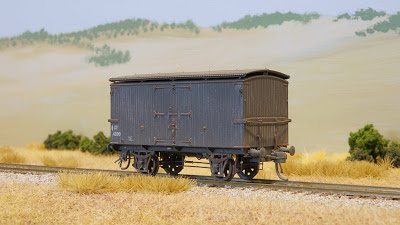
I really must dirty the CPH like these following wagons (some still have a bit of work to finish).

Austrains CW  

Austrains GSV

 Austrains ICV

Eureka Models BSV 

On Track Models HLV 


On Track Models LLV

And lastly, a stock train in the loop at Bylong.

Monday, December 10, 2012

Ampol Tanker No.3 - Weathered

I recently found a photo of the Ampol No.3 tanker on 24 April 1965 (right in my era) in the Train Hobby Blayney/Cowra Branchline book (page 21) and noted that it had a petrol spill from one dome. Here is an extract from the photo showing the spill. There is also another photo of the same train earlier in the book.


I decided that I would attempt to replicate this and here is the result.


I first gave it a dusting of a pale yellowish brown and then airbrushed some clear gloss in the appropriate area. I didn't use a brush as I felt that it would give too sharp an edge.
Unfortunately my air brush decided to spit and I ended with a couple of tinydrops when doing the dusting, oh well it still looks good.


But it could do with a bit more clear as this closer shot shows.

POST EDIT:

Here it is with some more petrol stain (clear), the spatter can be seen under the walk way below the first dome.


Tuesday, December 4, 2012

Post No. 100 - Back on line - 1960s Oil Tankers

Post number 100 and about 73,500 page views since my first post in late 2008, how time flies, but not the last couple of weeks.

Having survived the prostate removal operation, 4 days in hospital and another 7 days with a catheter attached I am now in the last stage, trying to get my bladder control back. Enough said about that though.

I managed to do my first bit of modelling yesterday based around several SDS Models Oil Tankers.

SDS released some of their tankers as single cars and as I have been running timetable operation with my existing kit bashed tank cars I decided that I would try to replace them one for one, brand for brand. The problem was though that SDS have not released much for the 1960's.

I decided to back date several of the 1970's versions.

I understand that there may be some errors in my approach (bogies possibly) but decided that I could live with that.

I bought an Ampol tanker with the small lettering, a BP, a silver Golden Fleece (1960 version already) and 2 Esso tankers.

I took a sharp hobby knife and carefully scraped off the yellow 80 kph hexagon signs and with a bit of careful air brushing I painted the grey anti-slip areas around and on the domes with black. I used a piece of card and held it in front of the dome side numbering which allowed a little overspray on the lettering (proper masking would have left a clear demarcation line to be dealt with).

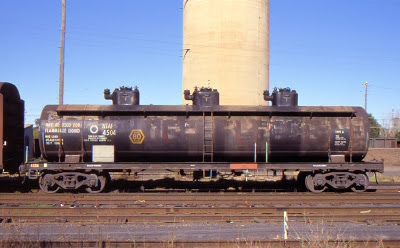
The silver Golden Fleece tanker was heavily air brushed with a grey/black until the lettering was just visible as per the photo of a real silver tanker below. I have also added a photo of the actual type of Golden Fleece tanker which from the test date appears to be from 1984. Note that although it is cleaner than the earlier late 1960s - early 1970s photo it has possibly been cleaned recently.


Here are the models:


And finally the Ampol tanker done before my operation.


I will add some more weathering with pastels as time (and other issues) permit.

Anyway, I am happy to back.


Saturday, November 17, 2012

S08 Silo for Wollar

When Auscision announced that the silos had arrived and there were only 12 S08s left I had a quick look at the layout to see where I could place one. Now I didn't have a lot of hope but since it was such a nice model I gave it a go. Often when we are really pushed something changes in our thinking and I immediately found a location at Wollar.
Wollar has two goods storage sidings primarily for the Cassilis Branch but they are placed behind the loco depot and can be difficult to get to. The inner or front siding is not too bad but the rear siding having other wagons in front of it is problematical. Also the rear siding is longer than the front and wraps around the curved main line and then straightens up for a short distance, just long enough for the S08. The siding will need extending around the curve to the level crossing so that the empties can be pushed past the silo then 'gravitated' into loading position. I say gravitated as in real life the siding was usually sloped to allow the use of handbrakes to move the wagons into loading position and then away again, however the model siding won't be sloped.
Here is an overview of the area, the photo is not up to my usual standard but you can get the idea. The siding will be extended to the left, the level crossing being just out of the shot (see road).


I immediately ordered a silo and it arrived about 4 days later.
The model comes with a very thick base which includes a section for the track which is 12mm thick, unfortunately it seems to have been designed for those who use use open frame and not full baseboards. For those with full baseboards (at least at stations which is I suspect more the norm) it means that you will have to cut into the baseboard to mount the silo and as the silo is  reasonably heavy being cast resin extra framing would be required. Now this isn't meant to be a criticism just a comment.
Luckily the siding I wanted to use was on a couple of thicknesses of cork and was sufficiently high to be OK if the cast track base area was cut from the silo.
Now, how to cut it off?
After much deliberation I decided that I would use a table saw which would cut from underneath the silo base, there being no room above due to the unloading pipe suspended above the track area. Maybe it could be done with a sharp handsaw but too much potential for damage.
The only problem was that I didn't own a table saw but I had been thinking about getting one anyway, so off to Bunnings and $112 later (plus a 40 tooth saw blade) and after assembly of the saw with the fine toothed blade I was ready.
I need to point out that what I had to do to cut the base can be dangerous as I had to remove the safety guard on the top of the table so that it wouldn't break the unloading pipe. I also had to check that the vertical guide behind the saw wouldn't hit the pipe, luckily it would miss by about 3mm.
I set the guide fence to what I needed to remove, placed the silo on the saw table and I stood to the side of the table out of the way of the saw blade and turned the saw on.
The resin cut well but I did take it slowly, it did make a mess though so I was glad I did it on a decking. I would appreciate it if no one mentioned this to my wife ;-)
If you attempt this then it is at you're own peril.
I have so far cut out the existing scenery and placed the silo on the layout.
Here it is in place in the scenery.
 

And a different view.


And finally without the bricks.


I still have to extend the siding but that will have to wait as I go into Hospital on Monday for my prostate removal and won't be able to do anything on the layout for about six weeks. I have got some building kits to make so I won't go stir crazy watching TV.

Sunday, October 28, 2012

Been a bit naughty

On Thursday I received my usually email of items on sale at Mwave, a computer online and street front store. Now this time mixed in amongst the items was a Sony NEX 5N 16.1 MP DLSR camera. Now this camera has a small body and two lenses, a 16mm and a 18-55mm and is reasonably suitable for placing into a model scene. Anyway, on Friday morning I went to work to find that my boss had gone to Melbourne so a quick search of the web was done. I found the camera at a shop I had previously used for $200 cheaper ($739) so after a couple of hours of soul searching I buckled, a quick trip and the deed was done.
Anyway, here are a few pictures I took last night.

4823 on goods in the loop at Bylong

4908 and goods on the main at Wollar

And again

3390 on the turntable at Wollar loco depot

The 18-55mm lense has f22 - f32 (f32 at zoom) these three photos were done at f32 which took 30 seconds to expose. I also found it necessary to adust the exposure compensation to get more light. Some contrast and brightness, a bit of sharpening and temperature adjustment was done in my photo program for the final results.
You might notice the Ampol tanker from SDS, this has been modified from the 1970's small Ampol lettered version by removing the 80kph sign and carefully spraying the grey areas around the tank domes black. Here is a photo of a very clean one with 1970 test date, no 80kph sign and areas around the tank domes that appear black not grey. Note that there is no 50mph sign either so the 50mph sign must have been after this photo but before the 80kph, sign appeared sometime later in the 1970's.


Well, I have to go now, I am supposed to be in the garden mowing and planting some new plants.

Friday, October 5, 2012

CW - Not so 'quick and dirty' now

The taller gap of the 'window' area of the Camco CW was distracting, making the CW taller and caused it to stand out amongst the Austrains CWs so it had to be sorted.

I did what I proposed in my last post and cut the top plate of the wagon side out and lowered it to match the Austrains CW. This resulted in the loss of the steel brackets of the internal angled braces but I think it was worth it. If the shortening was done at the bottom of the'window' by trimming the vertical frame'studs' and the angled braces the top brackets would have been saved and it could have looked better.

It's funny how we sometimes see a better way after we have completed something but then too much planning can lead to procrastination.

I used the Austrains CW roof as a template to mark the wagon ends to the correct end profile. The Austrains roof was held in place against the tops of the steel plates on the wagon end and the roof line was scribed with a hobby knife point. Almost 1mm was removed from the top of the end to match the profile, I used a pair of sharp transistor nippers to remove the bulk of the plastic then filed it smooth.

Here are the two CWs, much better.


One day I will replace the handbrake and bracket of the S truck underframe with something more suitable.

Tuesday, October 2, 2012

A bit of fun with a Camco CW

It has been a long time between drinks as they say (see Craig's Shed blog). It has been a month since I last posted and life has been interesting to say the least. I recently found out that I have a prostate cancer issue. Now this is the lowest grade you can have but never the less I will be having the full treatment (operation later in November is likely). The Doc said I could leave it for up to 10 years however I had lymphoma 10 years ago and it was 5 years before I could relax and safely conclude that it was gone. I have had some full body and bone scans and there is nothing else lurking as a primary or secondary cancer which is good. I am having the operation as I don't want to waiting around watching my PSA level rise and having a prostate biopsy every year - one biopsy was enough!

Anyway, back to the subject line.

I picked up some Austrains GSVs at the Liverpool exhibition and received the replacement pack of correct roofs. Now this left me with some spare CW roofs so I had a look at what wagons I could use them on.
I found that they would probably fit on a Bergs CV but the roof for that one was firmly glued on (see earlier blog of CV as storage shed at Wollar loco depot).
The next wagon I checked was a lone Camco CW that was going to go off the layout now that the Austrains CWs had arrived. The roof of the Camco CW came off easily and the Austrains roof just clipped on as nice as you like. Another reason to replace this roof is that the roof supplied with the Camco CW kit is actually a GSV roof, just the opposite from the current Austrains GSV roof issue.
Well, I thought this modification/rebuild might be fun.
The underframe on the Camco CW was lacking in detail and the solebar was very 'tall' so I decided to fit another S truck underframe to the CW (I refer you back to a previous post in which I fitted a Camco GSV with an Austrains S truck underframe).
Here is a photo of a Protype CW, the Camco CW and an Austrains CW for comparison. I think the Protype CW may be a candidate for an Austrains S truck underframe as well but unfortunately the body is about 1mm longer than the Austrains CW roof but that roof has to go.

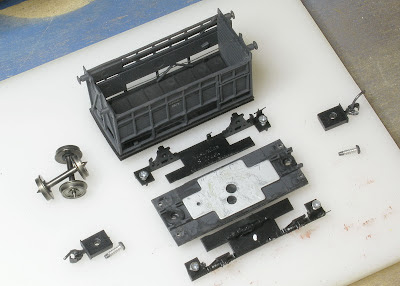
Here is a picture of the Camco CW and other 'parts' ready to be glued/screwed together. Note the end of the floor at the right has been modified to allow the floor to drop into the body to reduce the overall height. The left hand end has yet to be modified. About 1mm of the 'floor' is removed down to the 'frame sections either side of the coupler mounting area. The two frame projections sit on the step on the inside end of the body. Study the photo and you will understand what I mean.


And here are a couple of photos of the modified Camco CW with an Austrains CW for comparison.


The Camco CW is a different version and while not up to the quality of the Austrains CW it does still look reasonable so I think it might just stay on the layout. It turned out slightly taller than the Austrains version and it appears from the photo that the top plate of the body side frame is set slightly high. If the top plate was removed and lowered by its own thickness then that would resolve the problem. I should also point out that I could have fitted the new roof to the ends and sides a bit better by filing the end profile of the CW to match the new roof curvature. I think that I might do that as the higher roof line makes it stand out and the intent is to have the CW fit with the Austrains ones.

Anyway, there it is, a quick and dirty improvement.

Saturday, September 1, 2012

A Bit of a Plug

I recently received a package in the post with some items from the Laser Rail Bits range of NSWGR timber infrastructure kits. For those who don't know about these I suggest you check out Rod Kelly's NSWGR Southern Line Layout in a Shed blog and his ebay store. Now I personally think Rod is undervaluing his work but for the modeller they represent very accurate representations of NSWGR infrastructure at more than reasonable prices.
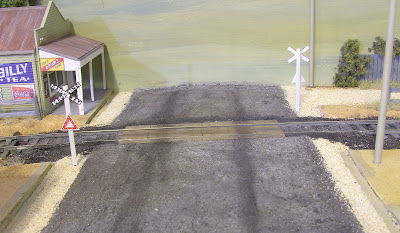
I used the 7.5M recycled sleeper level crossing for the road crossing at Wollar near the flour mill. This pack contains two level crossings, presumably for those who have a double track main line, for $7:50 plus $3.50 postage.
Here is a photo of the crossing, I choose to weather it with light and dark grey/black pastels rather than use anything liquid based as it is quicker (no drying time) and it eliminates any possiblity of warping.

I also built the small loading bank facing kit but used it as the platform facing for a small 'whistle stop' station on my Cassilis branch to pick up those local school children and add another operational dimension. This kit was just $12.95 and the same postage, of course if you buy several kits they are so light that the postage should just be $3.50 for the lot.
Here are a couple of photos of the station with a Rail Central PC1 station building recently donated to me by Bob Lynch when I was talking about my proposal for the station at one of my Bylong running nights.


Once again I weathered the platform face with pastels but unfortunately because of the position on the station and the layout room lighting, the detail of the laser cut kit doesn't show.
I also have yet to build one of the timber ash buffer kits but I won't be adding the angled side bracings as they were later repairs, the actual plans do not show them (the three at the rear are on the plan).
Well done Rod, I look forward to the other kits you have coming, particularly the paling fences, I know where I can use a few and the small coal stage version for the Cassilis loco depot.

Tuesday, August 28, 2012

Do as I say not as I do

A while back I told of a short circuit on a friends layout that could have caused a fire (actually it did cause a 1cm round fire that went out when I called for the layout to be shut down immediately). The short was caused by placing two track spikes on the same PCB sleeper, one with copper on top and bottom. The top of course had been gapped to stop short circuits but the bottom hadn't and possibly due to expansion and contraction, both track spikes came into contact with the bottom layer of copper completing the circuit from one rail to the other.
Well, I had the Ramblers over recently for an impromtu operating session and when I turned the layout on at 7:05pm I found that it had a short circuit that shut down the DCC, it wasn't there the night before!
The boys started arriving around 7:45pm to find me trying to track down the short. I had worked out that it was in the new Cassilis branch terminus station.
A careful examination found three rail gaps at points that had closed up, these were cleared but the short remained. The Rambler with the previous 'fire' short asked if I had removed one of the track spikes from the two on sleepers of the hand built points as I said I was going to do after reporting his shortcircuit 'fire'.
By now you know the answer!
Five minutes later with a number of track spikes laying on the Cassilis baseboard the short was gone.
The moral of course is don't put off something that you know that you should do and do as I say not as I do (or don't do as the case maybe).

Sunday, August 12, 2012

Mini Sand Blaster Fine Grit Supply

Earlier this week I received an email from Scott Hamilton with information about where to get supplies of the fine sand blasting grit for the mini sand blaster in my last post.

Scott sent the following information and links:

"I have found that Micro-Mark in the US sell the blasting medium in 5 lb to suit your sand blasting tool. The gun that you have seems to be based on the Passhe model which Micro-Mark also sell."


"Hobbytools Australia also stocks the abrasive medium for these 'air erasers'."
 Just a short post this time but I will post again soon.

Saturday, July 14, 2012

A Sometimes Useful Tool

The other Sunday my daughter and her family visited and I was given an opportunity to get out of the house while they looked after my wife Chris. I decided to go to Super Cheap Auto to get a small clamp I needed and while there I found a Mini Sand Blaster for $39.95 that needs  a 30-60 p.s.i. air supply. Now imagine an airbrush that sand blasts and I thought that here is a tool I can use. I must admit I have my fathers disease and I love to collect tools just in case I might need them.


Of course you have to take it home and try it out right away but I had visitors, I got to it later that night. Some years ago I inherited some model trains from Chris' uncle and among it there was an original run Model Dockyard C38 that had been stripped of paint and a few brass parts as well after it had been left in the stripper for a number of days. It had remained in this state since then and was very tarnished.


I set up a plastic storage box as a temporary sand blasting cabinet and had a try. Now I thought that some of you would be interested and have a use for one of these so I set up my video camera of the sand blaster in action.


Unfortunately the sand blasting grit is 220 microns (0.22mm) grain size and after I was finished the video I found that the grit had flown out of the box and was everywhere for a half a metre or so. This led me to buy another storage box that had a lid that was reasonably see through and I cut a couple of hand/arm holes into it. I thought about fitting gloves like the real cabinets but figured that not much grit would escape when my arms virtually fill the holes. I also fitted a grommet into the side of the box to allow the hose to come into the box, attaching the sand blaster inside the box. A small bracket is supplied to hang the blaster on so I screwed this to the wall of the box also.
Here are a couple of photos of the 'cabinet'.


The blaster comes with a small container of the grit and I didn't see any other supply at Super Cheap Auto (I will watch for it). I would suggest that you save the used grit for re-use as I am sure that the small amount of brass, etc. wouldn't be a problem. I should mention that the nozzle has a ceramic insert.
I am interested to try this blaster on scenic elements such as ageing wood structures/parts, 'weathering' wagons and perhaps ageing signs on the side of model buildings to name a couple.
If you buy one and come up with some other uses let me know.

Monday, July 2, 2012

A little work along the way

I have been looking after my wife after her recent back operation (everything went well and she is doing OK) and having little time for modelling I reverted to a system that I have used down the years. It is simple really, just try to do maybe half an hour every second night or so and you will be amazed how much gets done. I think it is that you know you don't have much time so you focus more instead of navel gazing on "how will I do this"?
Anyway I decide to upgrade a Bergs NSWGR D50 class brass locomotive that would be about 42 years old.
Why bother do I hear you ask, when Eureka is doing the D50?
Simply because I already have one Bergs D50 (5221) which I received as a 21st birthday present and that loco is going nowhere when the Eureka 50s come along.
I upgraded my 5221 way back when David Anderson had his shop and brought in his Mansfield D50 and its brass detail castings. I also have a Mansfield D50 but I couldn't say it is a good runner, it has always had a small bind that I haven't been able to find and rectify.
I thought that I would take my time and add the same details and changes to the second Bergs D50 that I inherited a few years ago from Chris uncle.
Unfortunately I didn't have a can motor to put into this 50 as I did to 5221 several years ago so that will have to wait until I can source another (it requires one with long shafts, most have short shafts to suit diesels).
Now the Bergs 50 had several issues, one being that the cab roof was maybe 1'3" too short at the rear cab overhang, the cab roof had no detail, the marker lights were too large, some of the piping wasn't right, added some more piping and the funnel and dome were a bit small.
I was also lucky to know someone in the electro-plating industry who re-plated the driving wheels of both Bergs 50s as the brass was showing through on the treads and this caused very poor electrical pickup.
Here is the loco with the work underway.


And here it is completed with its sister D50s.


I added a Soundtraxx DRGW K37 Tsunami sound decoder and speaker in the tender like my other two 50s. The tender also had new marker lights fitted and the poor turret tender bogies that were originally fitted had been replaced with the correct ones some time ago. I do have a Lloyds Turret tender kit which I will make up some day to replace the original, or maybe I will use one of the Andian ones when they are released.
Extra pickups were added to the loco and the tender bogies as well as a wiper for the chuff using my method of ACC Super Glue applied to the rear wheel rim  of the last driving wheel to make insulated sections.
I have noticed now that it is painted that there is a circular hole in the cab side for access to the sanding gear, for filling I think, so more work to come.
One day I might try re-gearing both of the Bergs 50s to get rid of the worm gear by mounting a gearbox on the rear axle inside the firebox and then sliding the motor inside the boiler barrel but don't hold me to this.

Friday, June 29, 2012

A warning - Please read

While reading the Aus_Model_Rail Yahoo Group tonight I noted a discussion on the use of DCC high amp boosters (10amp), short circuits and the way to handle them with circuit breakers, etc. The discussion has prompted this post and I pass on a warning for those using PCB sleepers with copper on both sides.
Recently I was at the first running night on a friend's new layout, now this layout had handbuilt points using the Fast Tracks method. My friend had been having mysterious short circuits that very day and said that the layout was out of action due to the short. On turning the system on so that we could check for the short he found that it was now working so the running night proceeded.
All was good for a while then as I was shunting his branchline terminus I saw a small approximately 8mm ball of flame erupt from one of the sleepers on a point. I quickly called for the layout to be turned off as the cause was immediately apparent.
There was a short caused by the track pins/spikes passing through the sleeper which had the usual piece of copper removed between the rails, however the copper layer on the bottom was still there and both pins/spikes were touching the copper at the top and the bottom of the sleeper hence a short circuit.
The scary thing here is that this is relatively standard practice in point building and as we often leave the power on the layout when we leave the room a fire could result.
The solution is simple, do not put a track pin on both ends of a PCB sleeper if it is double sided.
I checked my handbuilt points and sure enough I have the same situation on my Cassilis branch terminus but luckily mine aren't shorting.
I am going to remove one track pin/spike from one side of each PCB sleeper.
The interesting thing with this situation is that the booster didn't trip it just kept putting out the amps. I should also point out that the DCC booster was only rated at 5 amps, a very normal booster.
So beware, you have been warned.

Sunday, June 10, 2012

Thornleigh Brick Pit Exhibition

I managed to get to the Epping Club exhibition on Saturday and was pleasantly surprised by the quality and the number of new layouts on show.
Of course there were also the commercials to visit but I had to restrict myself a bit this time as Chris is not working due to her bad back problems. I picked up a pack of Austrains CWs and two of the Andian lever frame etches, a two lever and a three lever frame.
Well, I took a few photos while walking around and meeting people so here are a few of layouts that particularly caught my eye.


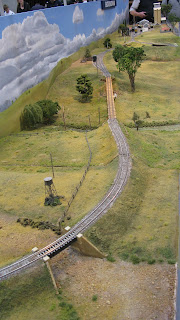
ARAKOOLA - A 7mm layout, very nice and not possible to all of it into the picture, there is a little more to the right.


WYEE - Very nice, there is more to the left of the first photo.


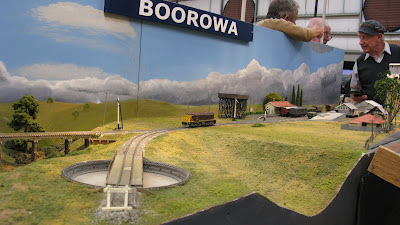
BOOROWA - A well done implementation of the scenery leading into Boorowa with photos of the real locations. The bridges need to be greyed up to represent old timber but still nice. The station area was highly compressed but this was likely done so that the interesting approaches could be modelled and space may be limited where it lives normally.


BULLENBUNG CREEK - A delightful, less is more, fine scale layout with a number of those quintessential NSWGR infrastructures features we love so much.


YENDYS - If you read YENDYS backwards you will understand the name. I quite liked this suburban themed layout which surprised me as I don't have any real interest in the Sydney electrics. You need to read the sign to the left of the road that is blocked by the police in the first photo then move onto the second. While the flooded creek is a bit 'cute' it is done very well. The street of flats and the shops also give a sense of perhaps a North Shore station. There is another half of the layout with an industrial theme to the left of the first photo. Over all well done.


GEOFF KNOTT - Of course you can't go past Geoff's work. Geoff and co. were running a scenery clinic for the kids and I saw several proud young ones walking away with a small diorama that they had made with guidance from Geoff and his friends.


AUSTRAINS - Finally, here are a couple of not too good photos of John Eassie's SRC, ICV, MV and LV wagons. Unfortunately they were at the back of a layout opposite the Austrains stand and with the barrier and gap to the layout front it was tricky getting a good photo.

I hope that you have enjoyed this rather disjointed view of the exhibition.