Sunday, December 24, 2017

Merry Christmas and a Happy New Year

Christine and I would like to wish everyone a Merry Christmas and a Happy New Year.

Hopefully there will be something interesting under the tree.

All the best,
Ray


Sunday, November 26, 2017

Signals Branch - Signal Relay Hut, Staffs and Steel Post Signal Detail Parts

Over the last couple of weeks I have uploaded a few more items to my Signals Branch shop.

Signal Relay Hut

At the request of Marcus Ammann I have just completed designing a 2 bay Signal Relay Hut that has now been added to my shop in two Frosted Ultra Detail (FUD) versions. One version is sitting on a  supporting frame  and the other is on the ground. There were a number of types of these huts and this version has been produced based on a photograph and a plan supplied by a friend. The version designed is not exactly like the plan and doesn't have the gutters as the photo seems to show that they are lacking.

The plan also shows old point rods being used as cross braces between the legs so the printed frame has holes for 0.015 inch brass or phosphor bronze wire to be added if the modeler desires.

Version on Frame
Version on Ground
Presumably the frame and ground versions depended on the particular location.

Although there is not much extra acrylic FUD material in the frame version the increase in price is due to Shapeways charging for the supporting material that is used in the 3D printing process and later washed away. The frame of course adding a lot more supporting material due to its height. I looked at having a separate frame but this didn't seem to make much difference to the Shapeways pricing.

Staffs

Quite a while ago I designed some NSWGR Staffs that the railway used for track occupancy permission. The idea is to use these on my Bylong layout along with printed tickets.

In use the Staff was given to the driver of a train and gave that train permission to use the next section of track until it was required to be handed in at the end of the section at the next signal box or station.

Staffs came in four types, at the end of each Staff was a round section within which was a hole shaped like a circle, square, triangle or a heart. Each different Staff was for a different section of track. The Staffs would repeat for the fifth section and beyond.

In support of the Staff was the Ticket. A Ticket was used when more than one train needed to use the next section of track. The first train was given a filled in Ticket to carry and hand in at the end of the section. More Tickets could be used as required for subsequent trains heading onto the same section. The Staff was used for the last train. Trains proceeding in the opposite direction could not do so until the Staff was at the other end of the section.

I believe that the Staff was also a 'key' to the Staff Box in which the Tickets were held. The Staff was used to unlock the Staff Box to gain access to the Tickets.

UPDATE: The following information was supplied by Colin Hussey.

The ordinary staff and tickets had colour associated with the head, you will notice the colour of the respective boxes and the cutout shape of the head, that cutout represented the colour that was also the colour of the tickets for the applicable staff and the section that it corresponded with.

Heart - Green
Round - Red
Triangle - White
Blue - Square

The staff opened the appropriate safe working box, no key on end meant no sidings in the section, whereas a key on the end was to unlock points.

UPDATE: The following information was supplied by Tom R.

The staff boxes typically have a hole for the staff on both sides of the box to allow the staff to be slid into the box, the annett key (if the section requires it for working intermediate sidings) on the end of the staff would pass through and protrude out the other side of the box, most of the photos you have posted above shows that the staff with a key is longer than the box is wide.

A staff for a section can only open each of the two (2) boxes for that section to obtain a ticket if required. There was / is a box at each end of a section.

A staff from another section cannot open a box from another section, this explains the corresponding staff head symbols and colours ( the colour was also stamped / written on the shaft of the staff as well on some staves). 

This was also another part of the safe working methodology in order to prevent over running the section with an incorrect staff as it would not be able to assist the train crew with working of intermediate sidings in the section nor open the staff boxes

My understanding (willing to stand corrected) is the staff can only enter the box from the right hand side when facing the box. The lugs on the shaft of the staff varied in their position and they corresponded with the unlocking mechanism of the particular section / staff boxes in order to open the box to obtain a ticket if required, again another safe working protection.

The NSWR document covering the use of the Staff and Tickets can be found here: NSWR Using Train Staffs

A PDF with 4 NSWGR Single Line Tickets can be found here: NSWGR Single Line Tickets

Note key on end of the staff

Another staff with key

Staff without key on end

In this photo there seems to be a place on the top of the right hand end to insert
the staff to open the lid of the staff box to access the tickets
I apologise to the owners of the above photos as I don't know who they are and hope that they don't mind this use of their photos.

I have two size staffs available, a small version that is 82 mm long and a larger version that is 116 mm long. The large version has a hole designed into the 'key' end of the staff to accommodate a 3 mm stereo plug that can be wired in different ways to act as an electrical switch if required.

The model Staffs have tabs along their length that could be used in a small Staff Box made from say MDF. The tabs can be used with appropriately placed micro switches in the Staff Box to electrically 'unlock' the Staff Box. The tabs are in different places on each of the four different staffs.

Here are some computer renders of the 'model, staffs.

Small - 'Model' Staff
Large - 'Model' Staff showing hole in end

Steel Post Signal Detail Parts

As you may know I designed a single steel post  brass NSWGR Signal and placed it on my Signals Branch shop a while ago. I also did the platform starter bracket signal found at the Sydney end of the Werris Creek platforms for Ron Cunningham's Werris Creek layout.

Brass Steel Post Signal with WSF Base and FUD Ladder
Brass Werris Creek Bracket Signal with FUD Details and WSF Base
The delay in designing more signals was due to the lack of suitable telescopic round tubing for the posts. At first I used some 1 mm Albion Metals brass tube for the Werris Creek bracket signal dolly posts but the next larger size for the lower section on a single signal wasn't available, hence the lost wax cast version mentioned above.

Recently I found some Ngineering brand stainless steel telescopic tubing that would work, at the Model Railroad Craftsman shop at Blacktown NSW. The tubing is not on the on-line shop so a phone order or visit would be needed.

The Ngineering web site does have an online shop however and I found that the shipping would be US$10.

The Ngineering product numbers for the tubing are:

Ngineering 0.042 inch stainless steel tubing - N2042-2 (2 pack) or N2042-4 (4 pack)
Ngineering 0.050 inch stainless steel tubing - N2065-2 (2 pack) or N2065-4 (4 pack)

I have designed the detail parts for Frosted Ultra Detail (FUD) acrylic material so that they can be slid onto the tubing to make a particular signal. Unfortunately, due to minimum wall thickness design limits it is not possible to make these parts in the 3D printed lost wax cast brass process from Shapeways. Anyway the brass parts can't be soldered to the stainless steel tubing.


I have designed a set of FUD detail parts for a single post signal with a 36 inch arm and also a set of extra post detail parts with 4 of each part but no signal bases for those modelers who want to make a signal with multiple arms, etc.


Single Steel Post Signal Parts Set
Different View of Parts Set

In addition I have added the Werris Creek Bracket Signal and associated FUD detail parts for it to the shop.


Monday, November 20, 2017

Signals at Bylong

For a little while now I have been back into working on my signals for the layout. When I started my Signals Branch shop on Shapeways and produced the line of signals in White Strong and Flexible (WSF) nylon material I worked out what I thought I needed and ordered all the signals. So of course when I later worked out how to have fine detailed signals in the more expensive Frosted Ultra Detail (FUD) acrylic material and to make them only a little more expensive than the WSF ones I already had all my signals. Bummer!

Knowing that I couldn't afford to replace the WSF signals with fine detail FUD ones (or my later brass ones for that matter),  my thoughts turned to cutting away the printed handrails that were too thick due to the WSF minimum design limits for 'wires' in the 3D printing process and replacing them with actual 0.015 inch phosphor bronze wire.

As a result  I had been trying to come up with a jig for bending wire safety handrails for the left and right hand bracket signals and the single post signals for some time and had designed and had printed a trial version, but I wasn't happy with it. This was well over a year ago.

A couple of weeks ago my wife Chris brought home an Aldi weekly flyer and I noticed that they were going to have a small 3D filament style printer for sale on the coming Saturday for $299. I investigated the printer on-line and found that it was a re-badged version of an existing small printer (a Wanhao i3 Mini 3D printer), so after watching a couple of YouTube videos of the other printer I was there at opening time on the Saturday and came home with the printer and three 1 kg rolls of the PLA filament in white, grey and black at $34.95 a roll. Note that this printer only uses PLA plastic filament, no ABS plastic with this printer.

The Aldi printer is called a Cocoon Create and is actually from a company in Melbourne, here is the link.

A few months ago Aldi had a larger filament printer with a heated bed ($499) and probably better than this one but I thought that this was all I needed for what I had in mind.

The printer didn't need to be assembled and set up was minimal but the included small manual must be read. In a short while I had the printer working away on a small cute dragon to test it. About 7 hours later it finally finished the dragon. The result was reasonable but it was obvious that this printer wasn't going to be making any fine detail signals but then I knew that.

My purpose for the printer was to do trial prints of designs to make sure that they would be OK before I placed them on my shop. Now as it can't do everything I will concentrate on useful items that it can do.

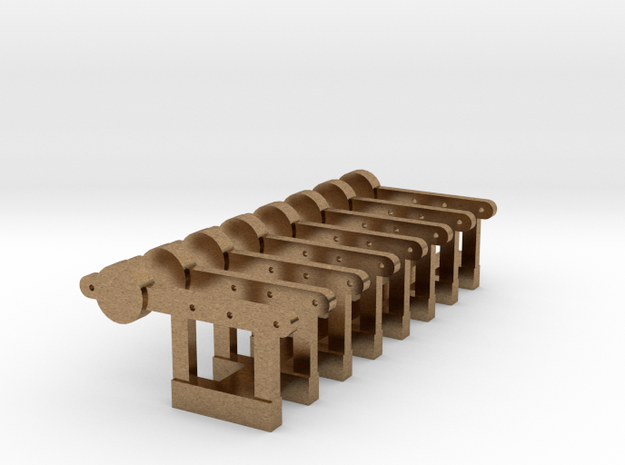
I then spent about half a day working on re-designing and printing versions of the signal safety handrail jig and after three versions I had it sorted. Now it might be said that $400 is too much to make a signal safety handrail jig but apart from saving the Shapeways printing cost I had also saved time as the three jigs would have taken about three weeks each between print test, redesign and re-order and this is very important to me.

Signal Handrail Jig Prototype

How to use the jig to bend the handrails
Once the jig worked I uploaded the design to my Signals Branch shop. The jig can be used for the WSF signals by cutting the printed ones off and drilling holes at the cut locations with a 0.45mm drill bit in a pin vise. It can also be used to bend up the safety handrails for the Fine Detail FUD LQ Signals and the Timber LQ Brass Signals available from my shop.

Over the last two weeks I have also printed off a few different items to explore the limits of the printer and it does have limits. Basically a design is best to have a flat base as the printer only uses PLA plastic filament that is heated and extruded onto a unheated plate and the first layer must stick. If the base layer is too small the print will move and you will get a mess.The supplied software that produces the gcode for the printer has an option called a Brim which is like the brim on a hat, that is it will be add around the base of the model to assist in bonding to the printer base plate. There is also an option for a Raft that can be used for items that don't have a flat base and this is a support under the whole of the item.

Here are  some servo motor brackets that I usually get from my Signals Branch shop.

Servo Motor Brackets still with Brim
One thing that must be said is that the printer is slow, slow, slow.......

Anyway, for those who are interested, I saw last Saturday that my local Aldi still had some printers and a small number of PLA rolls of filament. Be aware though that these basic printers aren't the type that are just press the button and go as some adjusting is required to produce a useful print, e.g. the printer base plate must be leveled for each print and attention needs to be paid to the printing temperature, Brim, Raft or None, etc. I was very aware of what I would have to do to get good prints as I have been watching the development of various types of 3D printers for many years.

So, back to the signals on the layout. I can make and add handrails, add one of my FUD signal ladders (available in 2 or 10 to a sprue) and add the wire ladder supports to a WSF signal in about 45 minutes now and I have done most of them with only about 8 more signals to add handrails to.

While the end result is not up to the standard of the fine detail or brass signals they still look quite good and are an easy upgrade.

Here are two photos of the partially completed signals in my Bylong station yard. The signals are yet to have the operating wires attached, be mounted and have the servo motors installed. The last thing I do with a signal is to glue the finial (NSWGR term is a pinnacle) onto the top of the post to limit damage while working on the signal.

This bracket signal is complete and ready to go with LEDs


Since Marcus Ammann has added working lights to his signals (WSF versions from my Signals Branch shop) on his Main North layout and they look good and can be seen from a distance I have decided to do the same. Some signals that can't be seen directly such as on a curve without direct line of site to the arm will have fascia mounted LEDs so I won't wire the 0603 Warm White SMD LEDs into those.

If you are interested I did a blog post on adding the LEDs to the above bracket. As a comparison to the photo above; the photos of the bracket signal in the post show it with the original printed handrails and ladder.

A big job doing all the signals for the layout but I think it is better to do it this way than piecemeal.


Monday, October 16, 2017

Focus, focus!

The other day I was working on the signal logic for Wollar using the Simple Signal Logic part of JMRI and having all sorts of trouble getting it right. This was for the signals at the Down end of Wollar station yard that have been quietly waiting for me to get back to them for the past two and a half years, those who know me will also know why the layout has stalled over that period.

After a couple of hours I went and had a coffee then returned to the layout room.

Anyway, as part of working things out (still not right) I decided to check which parts of the main line had NCE BD20 track detectors installed and reporting to JMRI. I decided to run a train from the Muswellbrook staging yard over the whole main line to the upper Gulgong staging.

I was focused on watching the layout schematic on the PC monitor with occasional glances to confirm where the train was as it traversed the main line. It came to Wollar on the upper level which was where I was particularly interested and it passed by me and headed for the Down end of the yard when I heard a noise that I had heard once before in my modelling life, it was the sound of a locomotive taking a 1430 mm high dive to the concrete floor.


I had forgotten to put down the two layout drawbridges when I came back after my coffee!

The locomotive was a Trainorama 48 Class and here is the result.


Luckily although it hit the concrete it then bounced onto a mat which stopped any further damage.

It appears to have hit on the drivers side end of the front buffing plate breaking it. The front bogie also disconnected internally from the clip on the top of the bogie that retains the bogie in the chassis. The front square bearing of the upper gear tower fell out, one brake cylinder came off the bogie, a pipe from that brake cylinder to the other one still on the bogie came off (not in picture) and one of the air tanks on the fuel tank also came off. All up the damage wasn't too bad.

I re-installed the bogie including the bearing, pushed the brake cylinder in place, added the brake pipe and also the air tank.

I had to take the body off to push the shaft of the buffing plate back out from where it had been jammed into the buffer body. I then glued the round end of the buffing plate to the rest of the buffing plate and waited 24 hours for that to dry/set. Finally I swung the buffing plate down to align with the shaft and glued that.

After waiting another 24 hours I placed it on the layout and it started and ran without a problem, well made Trainorama!


Now I just need to touch up some silver paint on lower front drivers side corner of the 'cowcatcher'. Is that what it is called on a diesel?

Of course I suppose I should explain the first instance as well.

Back in the late 1980's I had received a birthday present from my wife Christine which was an AR Kits 45 Class diesel that Chris had organised Terry Flynn to get for her so that I didn't know.

I was testing the slow running of it with my back to the door of the then layout room at our house in Helensburgh when I heard a similar sound. Sure enough and with the layout being DC back then a locomotive and train had been quietly creeping along the main line behind me and the locomotive took the dive to the concrete. Luckily the passenger cars didn't follow and the first one was still hanging half off the layout where the removable door crossing was supposed to be.

The locomotive was a Lima 44 Class that I had done a fair bit of work on including adding extra weight in the form of a large mass of lead. Now this piece of lead simply sheared off the plastic posts that held it in place and smashed its way out the front of the 44 class. The result was about 44 body pieces instead of a 44 Class. I think I might still have all the bits some where in a box in the layout room.

So as I said, focus, focus!

Wednesday, September 20, 2017

A Few More 3D Designs

I have just added three new items to my Shapeways Signals Branch Shop, these are:
A N Scale Standard Sleeper Take-Off
HO Half and Kilometer Posts that indicated distance from Sydney - These were the old rail type half and mile posts renumbered and moved (2 of each).
HO Kilometer Posts x 4 - Old Rail type

Sunday, September 17, 2017

Some New 3D Printed Infrastructure Items

I have just uploaded three new items of NSWGR infrastructure to my Shapeways Signals Branch shop.

These are:

NSWGR Standard Sleeper Take-Off
NSWGR Mile Posts - Old Rail Type - 1/4 mile, 1/2 mile, 3/4 mile and a mile post
NSWGR Speed Boards x 8
I have also uploaded a signal box door replacement for the Southern Rail Models concrete paneled signal box.
The timber plank door of the Southern Rails Model signal box is not the standard type although it may have been modelled after a particular signal box.


Wednesday, August 16, 2017

My Sound Decoder Function Standard

For a number of years I have been thinking through the problem of some sort of standard for function assignments on sound decoders. As we know each decoder manufacturer has decided to use their own 'standard' to suit their particular decoders. I have found this somewhat annoying so hence my 'thinking'.

I have a number of brands of sound decoders and these have varying capabilities. I can't afford to change out the older decoders for the latest types so I have to work with what I have.

I have first generation Soundtraxx Tsunami, latest Soundtraxx Tsunami 2, first generation QSI, QSI Titan and ESU Loksound 4 in steam only.

The early Tsunami has the functions in groups that is not every sound or lighting can be applied to any function you may want. This is somewhat restrictive compared with the later Tsunami 2 which can have any sound or lighting set up for any function number.

The QSI and ESU sound decoders also allow a lot of flexibility in aligning sounds and lighting with function numbers.

Working within the constraints imposed by the first generation Tsunamis of which I have quite a few I have now come to what I think is a reasonable set of function assignments or at least ones that suit me and the way I want to operate.

I am not one who wants to 'play a musical instrument' with a lot of button pressing and I am quite happy to allow the decoder to sound those random sounds such as injectors, blowers, shoveling, etc. Manual notching for diesels is also something I don't like as you can easily drive a train at notch one up and down grades with a full train load, not very prototypical.

I would have to say that I really like the Tsunami 2 with auto notching as it reads the BEMF and responds to the load on the loco. If you start a light loco it and use the throttle to notch up to say notch two or three it will do so but then once moving it will drop back and quieten right down. Similarly if it has a train load behind it it will notch up louder and then drop back as it gets the load rolling, very nice.

I also have a steam Tsunami 2 in a NSWGR C35 Bergs brass model and it also responds in a similar manner, chuffing loudly to get the train moving and then dropping back and chuffing lightly or even drifting once the train is rolling.

I believe that the TCS WOW sound decoders also work this way but I don't have one, this is the only reason it isn't included in the tables of function assignments.

I also want to work towards having working marker lights which will be a long process of course as some of the earlier models didn't have them and some decoders do not have enough lighting outputs either.

I have drawn up a diesel and a steam table for my new 'standard' and I have begun to re-program my loco fleet.

I have an NCE DCC system with the standard larger cabs. These cabs have 12 available function buttons but F10, F11 and F12 require the use of a Shift key to access. Functions 0 - 9 are all single press (Function 0 is the headlight). Also of the basic eight functions only six show on the LCD display.

I realise that not everyone will like or agree with my choices but they are of course just my preferences.

Here is a table showing the function assignments for a diesel.

And here is the table for steam.

Please be aware that I model late 1965 and as such the diesel function assignments do not include ditch lights, etc. of modern locomotives.

Most sound decoders only have 4 outputs, some do have 6 and there is one that has 10 and these have been listed on the PDF tables.

For those who are interested there is also a decoder that has 12 outputs and it is one of the Zimo sound decoders.

Thursday, July 27, 2017

Stock Train of Sheep for Agistment

A couple of weeks ago I was browsing in a camera shop looking at a top line DJI Phantom 4 drone and of course was approached by a sales assistant. We were discussing the drone when I noticed some tripods and asked if there were any that had a smooth head for panning with a video camera. Of course there was, so I am now the owner of a Manfrotto 290xtra tripod, only $199. It has a very smooth fluid head but has no level indicator so you must be careful how you set it for a long pan, I will get a small bubble level or use the App on my phone.

A week later in JB HiFi I saw a Manfrotto mount for mobile phones for $19.95 so home that came as well.

I now give you a video made with my Samsung Galaxy S7 phone of a stock train climbing towards Wollar loaded with sheep for agistment. Now theoretically loaded stock trains on the layout should be heading downhill towards the cities or the abattoir at Bylong but this one is going the other way.

As my layout time period is set in late 1965 (an earlier proposed mid 1950s alternative not withstanding) I have been told that my back scenes are too green as there was a drought in 1965, of well I am not repainting them. Anyway, the only way for a stock train to be climbing towards Wollar is if the sheep were being moved to better pastures.


I did try my video camera but I wasn't happy with the result, more experimenting needed or a new video camera. I had to remove a bit of noise from the video in my video editing program but I think the result shows promise. I have to work out how to control the auto focus a bit better, camera placement really, note the focus on the water column at Wollar.

Incidentally, I like the idea of playing around with a drone with a high resolution camera but I really can't think of a reasonable reason to get one, that is what to use it for. I suppose shooting video of whales passing on the coast would be pretty cool but it wouldn't do to lose it in the ocean. I saw a video on YouTube of one that was doing something similar when it got confused or the owner lost control because the sun got in his eyes and it ended up in the sea with its camera still running, luckily someone with a boat rescued it for the owner.

Saturday, June 24, 2017

A Holiday Observation and Other Things

Well, the sheep finally got tired of watching the trains go by and decided to have some lunch.

Train watching
Time for lunch
On our recent caravaning holiday to South Australia, it became obvious as we saw paddock after paddock, that 99% or more of the sheep were busy head down, grazing and I realised that I had to do something about it.

Once back home I fired up the computer and turned to my latest favourite modelling tool (as if you haven't noticed). I spent some time 'converting' a standing, head up sheep to a grazing one. It is just lucky that the sheep couldn't feel anything as I cut its head and neck off at the shoulders and swung it downwards. That was the easy part, I then had to fill in the gap caused and some hours later it was done.

Once the trial print sprue of 64 White Strong and Flexible sheep arrived from Shapeways I sprayed them with my dirty sheep colour, Tamiya XF57 Buff. This was followed up with Model Master Skin Tone - Tint Base for the face and the lower legs (below the knees as the wool doesn't grow there). At this stage I snipped the sheep from the sprue so that I could more easily paint their rear end with Model master Dark Tan (either observe or think about it). Now both Model Master paints were thinned with some acrylic solvent so that the colour would not be so strong and would flow and blend with the base colour. I make my acrylic solvent with about 70% methylated spirits and 30% window cleaner.

While the last two colours can be seen with the naked eye they haven't shown up in the above photo so perhaps I was being a little too subtle.

Anyway I am very happy with them and have ordered another sprue of 64 grazing sheep and they are now available from my Shapeways Signals Branch shop.

What about the heads up sheep? Well they will be going into the stock race yards when I build them as there is nothing to eat in the yards.

More Brass Signals

Since my last news about the brass signals I have been busy and now have 15 brass signals on my shop along with the appropriate White Strong and Flexible bases that the signals plug into.

I have listed them them here but please go to my shop to see them.

  • 16 ft post signal with 1 Siding Arm and other detail parts

  • 18 ft post signal with 1 30 inch Arm and other detail parts

  • 18 ft post signal with 1 30 inch Arm + 1 Siding Arm and other detail parts

  • 23 ft post signal with 1 36 inch Arm and other detail parts

  • 23 ft post signal with 2 Siding Arms and other detail parts

  • 23 ft post signal with 3 Siding Arms and other detail parts

  • 27 ft post signal with 1 39 inch Arm and other detail parts

  • 27 ft post Distant signal with 1 Distant Arm and other detail parts 

  • 27 ft post Home and Distant signal with 1 Home and 1 Distant Arm and other detail parts

  • Left Hand Offset Bracket  signal with 1 36 inch Arm and other detail parts

  • Right Hand Offset Bracket  signal with 1 36 inch Arm and other detail parts

  • Left Hand Bracket  signal with 1 39 inch + 1 30 inch Arm and other detail parts

  • Right Hand Bracket  signal with 1 39 inch + 1 30 inch Arm and other detail parts

  • Inverted or Underslung Bracket  signal with 1 39 inch Arm and other detail parts

  • Scarborough Siding Bracket signal - no Siding arms.

  • Sprue or 4 Siding arms, 2 Calling On arms, 2 Shunt Ahead Arms and 2 Wrong Road Arms.

I have just ordered an Inverted Bracket in Brass for my layout as the train drivers will have a sighting problem under a road bridge at Cox's Gap if a normal starter signal is used. I also wanted to get an order in before this GST change started for online overseas orders on 1 July 2017. I don't know how Shapeways will handle this although they do apply VAT on British orders.

If ordering the bracket signals then be careful as the view that the Shapeways system has put up is from the rear so the left bracket looks like a right and vice versa. Read and go by the model name. I have tried to change this but all I can do is change the orientation of the view that you get on the next web page once you have clicked on it.

As may have been noticed, there is one 'odd ball' signal among the fifteen and that is a bracket signal that was in the sidings at Scarborough on the Illawarra line. This signal was done for a friend and has been made available on the 1 in 1000 chance that someone else would want/need it. The bracket is unusual as it has two dolly posts and no main post above the landing, one dolly post is in the usual position on the outer end of the landing and the other is in the middle of the landing, very strange.

I will be doing the small brackets that held the small centrally pivoted siding signals that were attached below the main signals and these will be in brass. There seems to have been three variations of the brackets, an early McKenzie and Holland somersault type, a cast iron one of the Byles type and a fabricated one. I will do all three and probably put multiples of brackets and arms of each type on a sprue of each type. These will be done with a peg that will allow them to be mounted on White Strong and Flexible (WSF), Frosted Ultra Detail (FUD) and Brass signal posts by drilling a hole in the post where required and glueing or soldering them in place. These will be operational but the operating rod will be bent in a 'Z' shape as there is no way that the actual mechanism could be workable, too small. If you aren't sure what I mean by a Z shape then turn it on its side (sort of).

Of course I still have to draw up some more steel post signals including bracket signals, does it never end?

It is lucky that I enjoy the creative process as another form of modelling.

Oh, yes, here is something I did for a friend, a funnel for a H Class 17 Class Post 1924 re-classification). Something else that will have only limited appeal.

I have made it available in Frosted Ultra Detail, Frosted Extreme Detail and Raw Brass, I suggest that the brass version although more expensive will be the one to go for as the top of the early funnels were polished brass.

Ok, that's all for now.


Monday, June 12, 2017

Signals Branch Pricing Update

Well, after waiting for a couple of weeks on tenterhooks it seems that about 95% of my signals and other items on my Signals Branch Shapeways shop are cheaper!

We were away on holidays in our caravan when the pricing was updated by Shapeways (see previous post) so I wasn't able to have a really close look until we returned. I spent all last week going through things item by item and re-drawing several to reduce the price.

Several items went up but even those mostly weren't too bad. The largest price hike was US$30 for the set of 18 Werris Creek Station Awning Posts and Brackets in Frosted Ultra Detail. The pricing change as outlined last post related to Shapeways pricing in the waxy support material used in the FUD printing process to support any cantilevered parts. Of course the posts with brackets look like palm trees so a lot of support material would be used from the printer base upwards to the brackets, etc.

The answer was to turn them upside down and remove the supporting sprues on the bases of the posts, unfortunately, while the price dropped it was still too expensive. Strangely by doing the same to the set of 6 posts and brackets that are also available they worked out very well and as a result I have removed the set of 18 from sale as 3 lots of 6 works out only about US$5 more than the original price of the set of 18.

I hope all that makes sense and I give this information here to show some of the re-adjusting caused by the re-pricing. Incidentally, I had actually sold two lots of the 18 posts and brackets prior to the re-pricing which was nice as I wasn't sure if the Werris Creek bits would hold too much interest.

Also re-priced was the Precious Metals of which Raw Brass is a part. I was quite worried by this and had calculated that the two brass signals I had just added to the shop would go up by AU$7 - AU$8.

It seems however that I got the calculation wrong as the signals have dropped.

On the Signals Branch shop the 23' timber post signal and details bits was US$49.95 and is now US$44.50 while the 23' steel round post signal and parts was US$45.95 and is now US$39.95.

At the current exchange rate the two signals with the White Strong and Flexible (WSF) base mechanisms and FUD ladders work out at AU$79.50 for the 23' timber signal and AU$73.40 for the 23' steel signal (less brass).

There is always a 'fly in the ointment' though'.

Although not on the shop as yet, the Werris Creek platform starter bracket signal Raw Brass printing price went up by US$11.00!

If I can, some careful design investigation to try to keep the price down will be required for the other steel bracket signals.

The brass C32 tall 1907 sand boxes went down in price by US$4.95.

The brass counterweight levers and bracket signal bell cranks also dropped.

I have to stop here as there are too many to list, so go and have a look at the new prices.

Of course I have stated the US$ prices here mostly as the designers only get to work in US$ and the AU$ price varies with the conversion rate.

Incidentally, Shapeways only adjust the conversion rate once a month but I don't know when.

Tuesday, May 16, 2017

Brass Signal Update

I have almost finished the brass 23 foot lower quadrant timber post and 23 foot lower quadrant steel post signals, only requiring the 'glass' spectacles to be added with Krystal Klear and Tamiya clear tinted paints. If ordering these brass signals a White Strong and Flexible (WSF) base mechanism and a ladder need to be ordered to complete them. The platform safety rails are to be made from 0.015 inch phosphor bronze or brass wire.

Current total prices including the extra parts are about AU$80 for the timber post signal and AU$74 for the steel post signal. Prices of taller, shorter and bracket signals will vary due to the amount of brass involved. These two signals are currently available from my Shapeways Signals Branch shop.

While writing this post I received two emails from Shapeways announcing pricing changes for Frosted Ultra Detail and Raw Brass 3D printing. The changes come into being on 22 May for the Raw Brass and 25 May for the FUD. Apparently smaller brass items will go down in price and larger will go up, of course signals are large!

Of course any FUD items on my shop will change in price as well, which way up or down, I don't know at the moment, the FUD formula is difficult as it involves a calculation on the amount of support material used for each different item and some other factors. I will be informed of the actual price changes for my items on 22 May 2017 for Raw Brass and 25 May 2017 for FUD. Apparently Shapeways will adjust the prices automatically and then I will have to review and adjust prices accordingly,

I have used the supplied formula to calculate the new Raw Brass prices and they are:

23 ft LQ Timber Post Signal - Approx. AU$87
23 ft LQ Steel Post Signal - Approx. AU$80

Be aware that the prices on the shop are in US dollars.

So if you want to save a bit of money then buy the brass signals now before 22 May 2017.

Annoying!

Werris Creek UP Platforms Bracket Starter Signal

Also just needing the 'glass' added is the Werris Creek UP platforms bracket starter signal, this one was a real challenge! I had previously had it printed in Frosted Ultra Detail (FUD) acrylic material but I felt that it could easily have been broken by a clumsy arm reaching across the layout. The problem was that the upper bracket area is supported on the thinnest part of the tapering post. I then had to re-draw it for brass as the minimum design limits are slightly finer for the FUD material.

This pilot model of a steel bracket signal has the detail parts and signal arms on the dolly posts done in FUD with the posts being 1 mm Albion Alloys brass tubing, 1 mm rod would work equally well. I will be looking at how to print the two dolly posts in brass but the advantage of using the FUD parts and the tubing or rod is that you can decide what those dolly posts are like. Further thought required.

Given the just announced pricing changes from Shapeways, I have not been able to calculate an approximate price as yet because the FUD formula is difficult. The likely price before these changes using the FUD parts but not including the brass rod/tubing was going to be about AU$112.

If you are going to the Modelling the Railways of NSW Convention at Loftus this coming Saturday 20 May 2017 you can see these signals and others as I will be doing a clinic on building my signals.

Anyway, here are the signals, price changes aside I am very happy with them.

23 ft Lower Quadrant Timber Post Signal - Brass

23 ft Lower Quadrant Steel Post Signal - Brass

Werris Creek UP Platforms Bracket Signal - Brass


Sunday, April 30, 2017

Brass Signal Assembly Instructions

I have put a link on my Signals Branch blog for the assembly instructions for the new range of brass NSWGR signals.

The instructions can be found in the Links section on the right hand side of the web page and here.


Tuesday, April 25, 2017

Latest Effort - Werris Creek Platform Starter Bracket Signal

In line with my recent work on brass signals (last post) I have redesigned the Werris Creek platform starter bracket signal and had it printed in brass. This 3D printed signal was received a couple of weeks ago, prior to my last post.

Here are a few photos of the model as it stands today.


I have painted one signal dolly post for the photos in this blog post but I will be stripping the paint off and spraying the whole signal with some self etch black which will prime the brass and be suitable for the black parts. Of course painting white over the black will be interesting as it will have to be done by brush, carefully.

The prototype signal does not have bellcranks to transmit the signal box lever movement via wire to the signal arm and uses wheels instead. I designed the signal to have working wheels (drilled with holes to be a bellcrank) to get the operating rods up to the signal arms however they are just too small and fiddly to fit. In future the wheels will be cast in place (non-turning) and the operating rods will be bent to run behind the wheels.

To get the operating rod movement I used one piece of 0.015: phosphor bronze wire from the below baseboard mechanism to the counterweight lever. I bent it to replicate the operating wire of the real signal and threaded it through the wheel brackets behind the wheels. Check the photos to see what I mean. A loop of 0.010" wire was bent into a U shape and soldered to the post to retain the two operating rods and minimise flexing of the wire.

The brass post is glued to a boss on the top of the White Strong and Flexible, the square base of the post being hollow.

The two round steel dolly posts are 1mm diameter brass tube from Albion Alloys which can be purchased from Hobbyco, Bergs Hobbies, Brunel Hobbies and Frontline Hobbies. The detail parts on the dolly posts are Frosted Ultra Detail parts that slide onto the posts. The dolly posts fit into holes printed in the signal that need to be cleaned out with a 1mm drill.

Some holes need to be drilled with a 0.4mm drill, some cast OK and some don't. A supply of 0.4mm drills would be useful as I find that some drill well and others don't. I think it is how well the point has been ground.

The drills can be found on ebay or a pack of 10 drills can be had for $10 from McJing Tools in Yagoona NSW.

I will be investigating how to do these dolly posts with details attached in printed brass. I have to keep the height below the 100mm maximum build box of the 3D printer, so some more 'hidden' sprues.

This signal is a trial for the steel post bracket signals to go with the round steel post signal now available on my Signals Branch Shop.

Once this signal is done I will return to the Werris Creek station building, at last - again!

If anyone is interested in how my signals go together I will be having a clinic at the Modelling the Railways of NSW Convention at Loftus on 20 May 2017.


Wednesday, April 19, 2017

Brass Signal Update

Since my last post about brass signals I have added the rest of the signal parts to the post and the 23 ft timber post signal and a new 23 ft round steel post signal with parts have passed the technical review by Shapeways and are being printed.
These two signals are now on my Signals Branch shop.
Update: Signals printed and on the way as of today 25 April 2017 and Shapeways Sale information removed from this post as it was over.
Brass 23 ft Round Steel Post Signal with Detail Parts

Brass 23 ft Timber Post Signal with Detail Parts
I have also added NSWR C32 Sand boxes in brass, Frosted Ultra Detail and Frosted Extreme Detail acrylic material. These larger 1907 sand boxes have been designed to replace the smaller sand boxes of the Ixion C32 as outlined in an article by James McInerney in April 2017 Issue 323 of the Australian Model Railway Magazine.
Brass C32 Sandboxes for Ixion C32 - Also available in FUD and FXD
I will expand the range of brass signals as soon as I can.
Of course the appropriate WSF mechanism and a ladder are required for each signal.

Wednesday, April 12, 2017

A Couple of Things I have been Battling Against

OK, the title is just to catch your eye, no life dramas.

Firstly, I have been working with a Shapeways Service Team member over the brass signal situation and after about a dozen or so emails back and forth and a few more designs it looks like I have made a breakthrough. There is a trial brass signal currently on its way from New York. There are actually four of the same design coming, three for a friend who helped out as I wanted to test the print success rate and one for me.

The breakthrough came when I removed the rectangular base from the brass signal design. I finally worked out that the Shapeways production team for brass don't really like the designer to have sprues as a badly placed sprue to a part can cause the process to fail.

So the signal will comprise a brass post with platform, lamp, signal arm pivot, counterweight lever pivot and a counterweight lever attached by a very short sprue to a small square flange near the base of the post. This flange retains the post when it is pushed into the White Strong and Flexible mechanism that just happens to also have a rectangular base for mounting.

Unfortunately I wasn't able to include the signal arm, cast iron ladder base, lamp top and signal arm rear blind.The good thing is that the counterweight lever is brass so it will be stronger than the Frosted Ultra Detail (FUD) acrylic version although

These extra detail parts will have to be ordered in FUD from the existing range of FUD parts. One advantage of this is that the appropriate signal arm can be chosen whereas if it is in brass I would have to decide which arm to include on the brass signal.

A ladder will be needed and I have a sprue of two (without cast iron ladder bases) or a sprue of ten ladders with the cast iron bases. Of course an etched brass ladder can be used instead.

So the brass signal got cheaper without the rectangular base but the addition of the FUD parts took the price back up to about the same price as an all brass signal post and parts.

Here are some computer renders of the various items:

HO Scale 23 Foot Brass Signal Post
WSF Brass Base and Signal Mechanism
HO FUD 2 x 36 inch Signal Arms and Detail Parts
HO FUD 2 x Ladders (No Cast Iron Base)
HO FUD 10 x Ladders with Cast Iron Bases

The signal and others will be available once I make the coming signal, I will announce this at the appropriate time.

I will be doing a demo/clinic about making my signals, etc. at the coming Modelling the Railways of NSW Convention at Loftus on Saturday 20 May 2017.


Short Circuit!

The second thing I have been struggling with is a short circuit in my layout that seemed to start at the time of the 40 degree Centigrade days here in Sydney a month or so ago.

I did all the usual things such as looking for rails that had closed up around points, etc. to no avail. I then began disconnecting the DCC track bus wiring to various parts of the layout, still no luck.

Part of the problem was that I was supposed to have two track power districts but didn't! I had a sneak path between the districts that was confusing things. After a few weeks I eventually found the sneak path which was up behind the fascia at Coxs Gap at the dividing point of the two 'districts', it was some original wiring that went from one end of Coxs Gap loop to the other.

After many discussions with Marcus Ammann I tracked the problem down to one section but the short had degraded to a power drain and has now become intermittent.

I now have three power districts with NCE EB1 circuit breakers on each district and the problem is restricted to one of the districts.

The layout was turned on for most of today without any issues.

Now I wait and see if it will raise its ugly head again.


Thursday, March 9, 2017

Brass Signal Range Withdrawn

Well, I ordered another brass signal and had it rejected because it appears that Shapeways doesn't allow sprues on their 'Precious Metals'. The sprues on my signals attach the various detail parts (signal arm, counterweight lever, lamp top, etc.) to the base of the signal the same as the Frosted Ultra Detail versions.

It appears that my first signal managed to slip past the person doing the design check.

I can only conclude that these metals are aimed at jewellry and they are limiting someone making jewellery to only one item, although they do allow a pair of ear rings and cuff links - go figure, it doesn't make any sense!

I have just withdrawn 12 brass signals from my Signals Branch shop.

The brass signals were expensive and I didn't think I would sell too many but it is still very disappointing particularly when you have a nice example of what could be made.

I am very sorry and apologise to anyone who was contemplating these brass signals.

Saturday, March 4, 2017

New Brass Signals added to my Signals Branch range.

I have just uploaded eleven new brass signals to my Signals Branch Shapeways shop. These signals are lost wax brass castings from 3D printed waxes. The brass signals are nicely detailed even showing the bolts that go through the post for the various signal parts.

If you click on an item in the shop you will see a larger picture of the item with a 3D icon. Clicking this icon will give a rotatable view that can be zoomed. Please note that the zoom will pixelate eventually but this doesn't represent the model.

3D printed 27 ft Signal - Front

3D printed 27 ft Signal - Rear
The tallest signals (27 foot posts) have a separate finial (pinnacle is the correct term) cast on the signal base with the other detail parts. This will need to be soldered or glued into the hole in the top of the post. The reason for this is that the tall signals with finials exceed the 3D printer maximum bounding box (print volume). Shorter posts have the finial cast in place on the post.

A jig has been designed into the signal base to bend up the critical operating rod from the counterweight lever to the signal arm.

The detail parts on the bass can be removed using a pair of transistor nippers but a cutting disc in a hobby tool could be used with care.

There are a number of holes to be drilled with a 0.4 mm drill bit for handrails and operating wires. The positions are marked by small starter holes, some of which may have cast as holes as this is on the limit of the process. If there are cast holes then these will still need to be drilled with the correct size drill bit.

The pivot hole for the signal arm is undersize because of the wall thickness design minimum for printing and needs to be reamed out with progressively larger drill bits starting with 0.7 mm and then 0.8 mm, 0.9 mm and 1.0 mm. The pivot shaft on the signal arm will need to be very lightly filed to clean it up as it may be slightly out of round. The pivot hole and shaft need to be carefully fitted for a smooth rotating fit. It might be necessary to use a 1.1mm drill bit but don't make it a sloppy fit. Being a brass on brass bearing, once the signal is painted a small drop of light oil is a good idea.

To complete this signal a White Strong and Flexible mechanism needs to be ordered and glued underneath the signal.

A ladder for the signal is also needed and a sprue of two 21 foot ladders printed in Frosted Ultra Detail acrylic material can be ordered from this Signals Branch Shapeways Shop. A sprue of 10 ladders with cast iron bases is also available. These ladders are relatively flexible so will withstand a knock.

If you wish you could instead purchase an HO etched brass ladder.

A suitable etched brass ladder and a ladder forming jig are available from Keiran Ryan Models:    http://www.krmodels.com.au/

Or from Peter Boormans Workshop:    http://peterboormansworkshop.com.au/

Also required are:

0.015" phosphor bronze wire for operating rods, handrails, etc. (Tichy Train Group have the wire - #1102 0.015" 12 straight 200mm lengths).

1 x #4 6mm screws

1 x 3mm I.D. washer

2 x 2-56 12mm screws - 4 for bracket signals (either Kadee #1709 1/2" stainless screws- preferred or #256 1/2" nylon plastic screws - come in KD5 coupler packets)

Completed Signal
These brass signals are more expensive than the HO Fine Detail Signals (Frosted Ultra Detail) but may appeal to those modellers who like brass.

I have also recently added some brass counterweight levers and brass bracket signal bellcranks at the request of a modeller who kept breaking these when bending the operating rods around the ends of the levers/bellcranks to retain them when operating. I haven't broken any when doing this however these brass versions will eliminate the issue for those who wish to use them.

Brass Bracket Signal Bellcranks

Brass Counterweight Levers
As I add more HO Fine Detail signals to the range I will also add the equivalent brass versions.

I hope you find this post of interest.