Monday, December 20, 2010

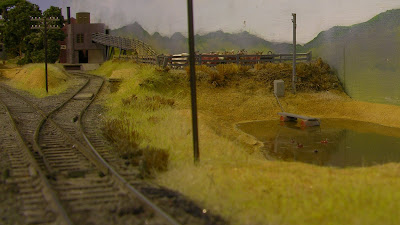
How's that for Prototypically Straight Track?

I am of course referring to my latest Desktop picture to the right.

I should apologise for my recent blog post where I led with a photo that I used on my last blog 5 weeks before!

Goes to show something, getting old? No don't answer that.

In the previous blog I also showed a picture of an overgrown siding and as can be seen by my desktop photo at right I have been a bit busy this weekend.
Here are a few more photos that I took to see how it was going, some areas still need some more work and clean up (grass laying all over the station parking area), etc.
Basically I have given the BYLONG station yard a going over scenically including the trees and I have finally finished the dam that supplies water for the livestock at the abbatoir, well nearly.


Lastly, I would like to wish you all a Merry Christmas and a Happy New Year and leave you with this 'Christmas card', my first attempt at adding smoke and steam.


Ray P

Thursday, December 16, 2010

A Long Time Since....

Yes, it is a long time since I posted on the blog, not since 30 October to be exact.
It has been a time of small changes to the layout and I mean small.
However, I was motivated tonight to post when I received this link of a 1964 film on Australian Railways in an email from Blair Kooistra of North of Narrabri only to discover that Blair had finally posted again when I went to copy his blog link for this post, I will leave you to check his blog but I will say that his is a very similar story except that mine was Triang in 1960 and polished Masonite.
What have I been doing?
Here is a photo of the new scenery around the Wollar flour mill with 3390 passing the Cassilis branch junction bracket signal and yes, it does work.


Another addition is this fine small shop built by Phil Gibson of Trainorama that I picked up a month or so ago at Toms Hobbies, Phil does very nice work and he makes these up every so often; I also have a large shop version of his that I bought a couple of years ago.


I was using my 3 year old $1400+ digital video camera at my Grandson's first birthday a couple of weeks ago and turned it off only to discover that it wouldn't turn on again. After dropping it into the approved repairer and waiting a week I was informed that the main board was dead and a replacement would be $700, it cost me $77 to find this out.
After several days of pondering over repairing or buying a new one I decided on the latter as I couldn't overcome my concern that if the main board could die so quickly once what was to stop a replacement from doing the same again.
I bought a JVC GZ-HD620 full high definition digital video camera, normal retail $999 for $799, that came with a free 8GB SD card and a promotion to get a free 500GB portable hard drive by following some simple steps and mailing in the required proof including the bar code from the box - BARGAIN!
I have been spending the last week experimenting with it and shooting some BYLONG videos, nothing to post yet but soon maybe.
Although it has full high definition of 1920 x 1080 it is difficult to produce a YouTube video that shows the clarity as uploaded videos seem to loose something along the way. I have also worked out that I need more light to acheive a higher f stop for a better depth of field. Now the thing with digital video cameras or at least the ones I can afford is that the highest f stop is usually only f3.0 but the GZ-HD620 had f4.7. My dead video camera had f8 but when I tried to use it everything was too dark, back to the lighting issue.
OK, here is a trial video as I couldn't help myself, 6037 climbing towards BYLONG on a coal train, yes I know that the coal is going in the wrong direction.

I picked up some new scenery materials recently from the Model Railroad Craftsman at Blacktown NSW. Gary and Maria have what I would say amounts to the largest range of scenery products around. The items of interest were new static grasses in dead grass colours (and greens) from MiniNatur at $13.50 per 50g pack. I have previously used Heki Winterboden which is a good dead grass colour but it is only about 2 - 3mm long, this MiniNatur grass is 6.5mm long, just the thing for that thigh high dead grass so common in Australia. I got a Beige, Golden Beige (yellower) and a slightly green but almost dead grass colour called Late Fall.
Here is a photo I took of an oil siding on BYLONG that is overgrown and little used. I know that oil sidings would probably have been kept clear of grass due to the fire hazard but I couldn't resist having a go with the new grasses.

I used Pascoes Self Shining Long Life Floor Polish (really a waterbased clear coating) as mentioned on Julian Watson's VR Days blog as an experiment to glue the grass and it worked well, it can be found at Bunnings and Woolworths for about $5 for 500ml and at Bunnings in 5 litres for $35, I am going to get this size soon. Like Julian I also tried it with ballast and will shortly try it with soils. It doesn't dry as hard as say PVA so could be useful if you need to take up some track later.
Well, that's about it for now, it's 11:33pm and I had better head for the shower and bed.

Saturday, October 30, 2010

What's Been Happening?

Another drought of posts from Bylong it seems but what has been happening?

Well, a few things that I didn't seem to think were worth talking about but maybe if I put them all together?

I just finished another hand held video of a train moving over the main line as an experiment in working out good angles, etc. I like it but the sound coming from the locos does get a bit boring but then I suppose it would be if you were driving them. There is a cycling noise coming from 4434 which has an Alco v251 12 cylinder Soundtraxx Tsunami but not from 4530 which has an older Alco Soundtraxx DSD decoder. The 45 also sounds more 'rounded' even though it has the 8 bit decoder compared with the 16 bit Tsunami. I put this down to the use of a good quality oval speaker in the fuel tank of the 45 as against the supplied Trainorama speaker in the 44. I think that the cycling sound is because I had been playing with the reverb settings, I must check. Also the horn that can be heard as they start out of Wollar has a vibration which is a wire running across the speaker front. I have to open up the 44 to fix this and we all know what an interesting job that is.

Two weeks ago I bit the bullet and decided to do the scenery around the flour mill at Wollar that is situated between Wollar and the branch junction. I think I managed a reasonable transition to the backscene although the general impression is too much green (it is supposed to be set in the spring of 1965 so it's probably not that bad).

I now have a 3 foot section (sorry, no metric this is 1965 remember) between the flour mill and Wollar station which is a drawbridge section used to enter the layout from the house. Part of one of the hinges can be seen in the lower right of the above photo. There are two hinges and they will be an interesting challenge to scenic and keep operating as they stick up above the baseboard by about 1 1/2 inches. Anyway, the Wollar loop ends on this section of the layout about half way across and I have decided to add a level crossing after the point with some shops and small industries on either side of the road and crossing. I dug into my collection of kits last night and think I have come up with some interesting possibilities but you will have to wait, don't hold your breath.

I went to a 90th birthday party last Sunday for my great aunt who is the last of five sisters and three brothers who came to Sydney from Werris Creek in the late 1930's. Needless to say there was some railway connection.

My wife Chris has been doing family history for the last 25 years or so and a few years back we called into Werris Creek station museum before it was done up and in the books and various documents on display were some records showing details of the workers including family members. To my astonishment she has since found something like 10 or so that have worked for the NSWGR down the years.

I had a great-great grandmother Gatekeeper at Turanville a few miles south of Scone in 1884.
Turanville Level Crossing 2005

Another female Gatekeeper at Limbri north of Tamworth in the 1890's.
Site of Limbri Station 2005

My great grandfather worked in the yards at Werris Creek and my grandmother was a RRR girl in Sydney until she retired. There was also a ganger and earlier generations lived and worked at West Tamworth.

Werris Creek Station 2005
I have memories of watching trains from the verandah of my great grandfather's house at Wiley Park, a nice old federation home (the reason that our present home is a modern federation interpretation). Incidently, the family house is still in Dewhurst St Werris Creek in really good condition.
Cartwright house (1920/30's) - Dewhurst St Werris Creek 2005
Chris could certainly tell me about all the others but I won't bore you here. I guess I was wondering if there is a genetic effect, no not really, it was those trains from the verandah and my great grandfather taking me down to the tracks to watch the trains.

It all makes it all the more interesting when I work on and operate on Ron C's Werris Creek layout, I feel a very strong connection.


What's next?

Yesterday I picked up copies of Train Hobbies Steam Locomotive Depots - NSW Part 2 and Country Branch Lines - NSW Part 3 for Cooma, Bombala, Canberra and Captain's Flat at Berg's and a nice quiet read with a coffee will go down well.

Wednesday, October 6, 2010

Liverpool Exhibition

The Liverpool exhibition has came and gone again and I found it to be very inspiring. I normally go twice but this time we had to go to a wedding at Robertson on the Sunday and my daughter's birthday on the Monday, however the one visit still gave me a boost.

I arrived at about 1:45pm and left at 5:00pm having only made about one complete trip around all the exhibits due to stopping and chatting.

I also managed to take a few photos, something I usually give a miss as exhibitions are not the best for trying to take photos ( for some reason the trains keep moving). I also hate the use of perspex as it makes photographing very difficult. I had some nice shots of Time and Patience  and Central that I can't use because of the reflections of flourescents lights over the models beyond the perspex, grrrr!!!!

Here are a few shots that I like.

Ross Balderson's Central Station 1958.


Museum Station
Wallerawang

Time and Patience


Waterfall


I damaged the bank account with some book purchases but had to leave a lot of other interesting stuff behind.

All in all, a good exhibition.

Tuesday, September 14, 2010

Ray's 'Patented' KD Uncoupler

I have for many years been looking for a manual uncoupler for Kadees that works. I bought the Kadee version but it hardly works at all except it is better with the new scale head couplers. Another, the Rix Products version uses two magnets that are placed between the wagons either side of the couplers, unfortunately, since I am modelling NSWGR in 1965 many wagons have buffers so this uncoupler can't be used.
My first attempt at making one many years ago (20+) worked well but it was always difficult to see between the wagons.
While doing the grocery shopping a week ago I noticed a clip on LED book light and the penny dropped and here is the result.
This uncoupler really works very well, the video shows the uncoupling of various types of KD and KD clones in various combinations, The only slightly issue is with the plastic KD clones as the uncoupler occasionally catches slightly but as I intend to replace these it won't be an issue.
Incidently, the new scale head whisker variety of KDs are very good, much better than the old standard KD No.5.

Sunday, August 22, 2010

Backscene 1 - Signals 0

In my last post I was about to install the new signals that Dale Richards made for me and I thought that this was the next logical step, wrong!
I realised that I neeeded to paint the backscenes along the garage doors before I could safely install the signals at the branch junction as I would have to remove the backscene panels for painting as it was too far to lean across the Bylong station section below.
Oh well, we can't always do what we want when we want to can we?
I had investigated the paints I needed to use a little while ago and these were made by Jo Sonja and could be found in craft stores (of the female persuasion) but also at Bunnings. Jo Sonja makes a range of paints called 'Background Colours' and from these I used the following, Sky Blue for distant blue hills, a mix of Sky Blue and Forest Green for shading the blue hills, Oak Moss and Forest Green for distant wooded hills, Oak Moss for distant grassy hills, then Vellum and Willow mixtures, some with a little Forest Green for closer fields.
I used my digital projector to project a suitable long panorama scene I had taken in the NSW countryside onto the backscene and then sketched in the horizon, mountains, hill lines and foreground features, etc with a 6B pencil.
After trying out my painting techniques on a small piece of previously sky painted backscene I held my breath and started earlier this week.
Here are some pictures of the result.
Now I worked out the horizon by looking at the projected picture as roughly my eye height which seems to work pretty well in the above photos but here is a 3/4 view of a train on the grade to the upper staging and it certainly doesn't work from this view, looks like you can't have it both ways which is one of life's little rules.
Also note the way that the foreshortened view causes the hills and mountains to become peaked. The only way to reduce this is to paint your hills and mountains very long horizontally if you understand what I mean.
A comparison with older photos will show that I have matched the colours of the old backscene reasonably well but without the misty effect I achieved with a can of grey primer sometime back.

Wednesday, August 4, 2010

Working Lower Quadrant Signals

I have been asked in a comment on my last post if the signals are made to work and if so, do I intend making them work, the answer is yes on both counts.

I have had two signals working for about 6 years now and thought it was about time I pushed the signalling along.
I received the two brackets and two home signals last Friday night and have just started to work out their exact locations on the layout, hence the picture in the last post.
To make them operate I use cheap relays with a fine phosphor bronze wire soldered onto the 'clapper'? (the moving piece) the other end of wire is threaded into a hole in the bell crank arrangement to operate the signal. I also use a small weight on the crank to make the signal fail safe, i.e. a loss of power brings the signal to stop.
Now, you can use bell cranks available from model aricraft hobby shops that are quite cheap but I use the Circuitron Actuator (Part 800-8101) that is actually made to do just this job, although when I first bought them about 6 years ago I didn't realise that is what they were for.
I get them from the Model Railroad Craftsman at Blacktown and here is a picture from the Circuitron product catalog:

The actuator comes with 450mm (18") of wire in tube as shown above that would help with placement of the Tortoise motor if you are rich enough to use them for this.
The bell crank has limits placed on it's movement (adjustable with the two small screws) so that the stress is taken by the bell crank and not by the signal mechanism.
I will be mounting the signals on a piece of 3mm MDF and will set up the bell crank and signal connecting rod on it as well. I will lower the bell crank part through a suitably sized hole cut in the board and fit the relay underneath after. The relay positioning is easy as the phosphor bronze wire is about 100mm (4") long and has a lot of flexibility, it also takes up the excess movement at the bell crank.
I have previously installed the board under the layout by putting the signal up through a hole in the layout baseboard as this allows the signal, bell crank and relay to be set up and working but at the expense of having to fill the hole through the baseboard and around the signal. Does that make sense?


Simple enough really.

Tuesday, August 3, 2010

Back Again

I have just spent an inordinate amount of time removing a thin layer of 'plaster' and ballast next to the main near the Ulan Colliery branch junction. Now this may not seem much but it took me about 10 minutes to remove about a 1" square section to provide a flat area to mount a new bracket signal that Dale Richards made for me. Now this piece of layout was sceniced in about 1982 with plaster and ballasted using PVA (I think; it has been a long time). I have struck this same problem before with scenery around the Bylong station area which was originally done in 1979.
I don't have any answer to this riddle it just had me amazed at the difficulty.
I took this photo to check how the signal looks and am very happy with it.

I will soon be removing some of the plaster on the small bank in front of the white railway gate so that I can install a small sleeper built retained area for the signal box that will control the junction and the Sydney end of Wollar yard. Given the difficulty experienced so far this could be an interesting exercise.
I also contracted Dale to build another bracket signal and two home signals for the branch junction on the main beyond the Gulgong end of Wollar yard. just past the flour mill.
I decided that it was time I did something about signalling the layout and finally decided on the 'style' of signalling.
I went for homes signals outside of stations and loops, the two junction brackets and a couple of distants where there is room.
The next step upwards in signalling gets very complicated with brackets inside yards to indicate main or loop, starting signals, etc.
I have decided that the trains will be started by the signalman or stationmaster using a green flag (as they did) and yes, Bylong is operated with signalmen and stationmasters as we can only run about 4 - 5 trains at any one time and there are about 10 of us when we operate.
The 'green flags' in my case though will be green LEDs on the fascia of the layout opposite the ends of the loops or on the main. These will be operated by the stationmaster/signalman using a momentary contact push button. The button will be pressed for a few seconds and the train driver will respond by blowing the whistle before proceeding out of the station. It will be a momentary push button as I am sure that the real stationmaster would not hold his arm up forever (no there won't be any silver whistles issued either).
The purists will say this is all wrong but I am looking for something that appears to be more or less correct without all the complications that would tie up the operations too tightly.
Now, if I follow my usual work regime, it will probably take me another two years to finish this little exercise.

Tuesday, July 13, 2010

Hey, I'm back

I didn't go anywhere, I've just been doing lttle fiddly stuff that I didn't think was worth writing about.
One thing I have been trying though is to come up to Bob Stack's standard of Illawarra / Blue Mountains type scenery for the Coxs Gap area of my layout.
Just so you can compare and realise that I still have not made it, here is a video Bob has just put on YouTube from his South Coast Rail blog.
Having checked his scenery out you can now see my efforts.

What I see I need is more bushes, more shrubs, more weeds and to tone down some of the greens with my airbrush. Of course the tiny air bubbles in the rock castings are going to have to stay, I'm not the focussed.
Here is an unusual 'helicopter' shot of the area I call the tear drop as the line climbs from Coxs Gap to Wollar. The junction is to the Ulan No. 1 coal mine towards the back on the left behind the outcrop at the end of Coxs Gap loop.

Chris and I took our grandson Cameron to RTM at Thirlmere for his first trip to see the real thing recently, he loved it, so we will see if he keeps the interest over the years. No, I haven't been encouraging him to like trains, that would be Chris.

That's about it for now and I am going to be off the air next week as we go on a short vacation, no trains, no internet, horror! Well they tell me there is other stuff you can do to while away the hours pleasantly.

Monday, June 14, 2010

A Great Weekend

As you have probably noticed things have been a little slow on this blog of late. I think it has something to do with winter and that it can get cold in the garage. Now, that's not the whole truth as I can turn on the air conditioner to fix that. I some how manage to fall into a creative hole occasionally and this has been one of those times.
Saturday Night
About two weeks ago I got an email from Andrew Campbell of Bowen Creek fame asking if he and Ian Millard (Liverpool Range) could drop by on the Saturday night of the Epping Exhibition weekend to see Bylong. Note that I related the weekend to a model railway exhibition and not the Queen's Birthday, must say something about me I think?
Anyway I agreed and they turned up at 7:30pm on Saturday night having spent the day at the exhibition. I had only met Andrew for a few minutes at last year's Epping exhibition when he and Ian exhibited Bowen Creek and had not met Ian at all.
After the introductions to Chris and my 3 year old grandson Cameron we moved into the garage (yes, I did have the air con on). I then talked them through the railway from the lower Muswellbrook staging through the first tunnel to Kerrabee loop and station then across the Goulburn River into the second tunnel, up the 1 in 40 grade to Bylong then the third tunnel to the 1 in 80 of Cox's Gap loop, then more1 in 40 around the tear drop, past the junction to the coal mine, across the Wollar level crossing, through Wollar, past the Cassilis Branch junction then up the final 1 in 40 to the upper staging at Gulgong.
After this introduction I suggested that they should take a goods from Muswellbrook to Gulgong and of course in keeping with one of the main operational reasons for the layout, the train needed to be banked from the rear. Andrew volunteered to drive the banker with Ian on the head.
After a quick introduction to the NCE radio Pro Cab throttles Andrew took 5085 from Wollar loco and descended all the way down grade to Kerrabee where he moved to a short siding off the Muswellbrook end of the loop. Ian then selected 3532 on the goods in Muswellbrook staging and slowly proceeded to the Kerrabee loop. Andrew moved 5085 up to the MHG and gave a long, short and another long whistle which Ian responded to with a long whistle and the throttles were carefully opened up as the train began it's journey.
After crossing the Goulburn River bridge and passing through the tunnel, the 1 in 40 grade began with an easy climb to Bylong. They drove on slowly through the Bylong tunnel and through Cox's Gap loop until they were about 3/4 of the way around the tear drop when they slipped to a stop. It seemed that the extra two wagons I added to the train that afternoon were too much (one was a Protype white metal CV!). I suggested that they back down to Cox's Gap loop and then make a faster run at the grade. This was tricky as they didn't have a very long run before the 1 in 40 'S' curve at the start of the tear drop, however with a little bit of wheel slipping they managed to top the grade, whistling for the level crossing at Wollar as they moved into the station.
Realising that they would not make the final grade to the Gulgong staging I suggested that we cut in a C32 which I would drive. Once the 3390 was in train, whistles were exchanged and three separately driven locos took the train up the grade and into the staging. As the train crested the grade Andrew driving 5085 dropped away from the train and coasted to a stop then drifted back into Wollar. He then put 5085 away in the loco depot after dropping the ash, coaling and taking water.
This was the first time that three locos had been used this way on Bylong and I enjoyed taking part, it felt like the real thing as we battled to lift the train up the grade and the feeling of accomplishment when we crested the hill was very real.

In this picture I recreated the last climb this morning by backing the train down from the staging so that you can 'see' the action. I have calculated that the train would have been 590 tons with the RUs and BWH being empty and all other wagons loaded. The load allowed for a C35 + C32 on 1 in 40 grades is 480 tons and a D50 can haul 295 tons on a 1 in 40 grade giving a total capability of 775 tons so this load was certainly prototypically correct. Please note that I weight my wagons to 2 grams / foot which gives these prototypical hauling capabilities (not counitng the Protype CVs of course).
I can only say that we had a very enjoyable time running the layout and discussing all those current topics doing the rounds of the hobby at the moment. After a top night I feel that my circle of hobby friends has just expanded and the offers of visits to Port Macquarie that were extended to Chris and myself were truly appreciated.
Sunday Morning at the Brickpit - Epping Exhibition
I went to the exhibition on the Sunday morning for a couple of hours and found a well lit spacious exhibition with a nice range of layouts and commercial stands. I won't say too much more as a number of attendees have already done so on the web with their reports but I will add a few photos.
Those who know me must have been more than a bit surprised when I proceeded to photograph various scenes on the layouts using my mobile phone. I find that exhibitions are not very good for model photography ( the trains are moving) so I had left my camera in the car. I started to go back for it when I saw Geoff Knott's latest On3 timber layout but decided to see what my phone could do.
Here are a few pics, sorry, no trains.


Geoff Knott's Charging Moose Mining & Lumber Co.

A-tractiv Effort Newcastle suburban layout

A Bavarian layout - nice scenery
Sunday Afternoon
I left the exhibition at 1:15pm and drove to Bob Stack's place for my first look at his South Coast Rail layout. I have been looking forward to this as I believe Bob is one of our finest scenery experts specialising in Illawarra escarpement / Blue Mountains style of scenery. Bob uses many different products both commercial and natural to produce the vegetation that grows profusely over the cliffs and hills of his layout.
Bob's brilliant rock work and vegetation (note the wet rock)
Bob's gorge (see his blog for a more complete photo)
Bob explained to me how he does his sandstone rocks and cliffs and I don't think I have seen his method in any magazine in all the time I have been in the hobby (since 1966).
Bob uses an almost dry plaster mixture (I am thinking pie pastry before cooking - ask your wife, girlfriend or mum) over a chicken wire former and he includes pieces of white expanded polystyrene foam which he covers with the mixture for outcropings. He then puts a basic wash of brown oxide over the rocks and I am sure he does some carving, texturing and shaping as well. When dry he then uses matt hobby paints and dry colours to add the myriad colours that are present in a sandstone cliff face (just have a close look next time you are in the bush).
Bob was very free with his information but I am not sure that I could reproduce the quality of his work. Those who are attending the Modelling the Railways of NSW Convention in July will have the chance to see Bob talk about his scenery methods.
I left late in the afternoon heading south across Sydney thinking what a real gentleman Bob is.
All in all, a great weekend, batteries charged, now to get back into the garage.

Monday, May 10, 2010

4206 arrives at Bylong

In case you were wondering if the Trainorama 42s have arrived, the answer is:

A Video of the Bylong Main Line

Here is No 83 conditional empty wheat train as it traverses almost the full length of the main line on my Bylong layout. The first 20' of line through Kerrabee wasn't good enough to post (in and out of focus, I got too close).

This gadget seems to only be 4 x 3 format so here it is on YouTube:
16 x 9 video.
The video was taken in one go as the train climbed from the lower staging yard at Muswellbrook to the upper staging at Gulgong.
Some sections have been cut out due to too much camera movement as I tried to keep up with the train. Almost all of the main line is shown except for the Cox's Gap loop and signal box, way too much movement.
If I ever build another layout then I will be aiming to have a lot more vertical space between the decks as it is difficult to take photos and videos in the current 10" or so (250mm).
One thing I have learnt is that using a video camera is an interesting challenge and good lighting is essential. To this end, I added four more low wattage flourescent lights to the lower deck under Wollar on the climb up into Bylong.
After installing the lights my HD digital video camera decided it didn't want to turn on last weekend and is in being repaired at the moment, well I am waiting for a quote anyway. It will have to be repaired as it is only 26 months old and it cost about $1400, of course it is out of warranty.
This video was taken with a small hand held Sanyo HD digital video camera shaped like a pistol so I couldn't put it down on the layout. This camera is my daughters and I did this video to try out the camera and the lighting.

Saturday, April 24, 2010

Bylong Operating Night

We held another operating session last night and all concerned felt that it went very well and that the layout operated very well which was a relief.

The layout is run to a 12 hour timetable that starts at 6:00am and concludes of course at 6:00pm. The timetable is run at a fast time rate of 6 to 1 so that 1 hour on the fast clock is 10 real minutes. This was made easy by the use of the clock facility in the NCE DCC system where the fast time is displayed on the Pro Cab throttles. Marcus Amman was also kind enough to bring along two fast clocks that plug into the cab bus and display the fast time in large red LED numbers. One clock was placed at Bylong and the other at Wollar for the Station Masters.

We ran again using NCE radio throttles as since the previous operating night a number of the Ramblers had their Pro Cabs converted to radio. There more than enough radio throttles to run the layout. The radio throttles performed flawlessly with no one complaining about delayed response or missed keystrokes.

We ran 25 trains during the session and finished the night at 6:00pm fast time one train movement behind the timetable which all agreed was pretty good, better than last time.

We didn't have a dedicated Station Master / Signalman at Bylong this time. That was my fault as I didn't ask for volunteers and we did have one instance of two trains in the section between Bylong and Cox's Gap Loop but not a cornfield meet due to that lack of control. There was one other instance when I was shunting the branch mixed in Wollar and I gave permission for a passenger train driven by Dave "Rowdy" Allen to leave Wollar down the grade to Bylong as a coal train was climbing the grade. This of course was very wrong of me as I had usurped the power of the Wollar Station Master, Layne Hardy. Layne has been the SM for the last two sessions and has done a really good job although he did say that next time he would like to run a train or two.

I will leave you with this YouTube video of 3532 on 81 Goods banked by 5085 as it passes through Bylong in preparation for the climb to Cox's Gap and Wollar. Apologies for the quality of the video but I quickly grabbed the camera and took the video without having the chance to set it up so that the focus was better. It is however interesting to listen to the discussion going on .

Sunday, April 4, 2010

Decision Made - Action Taken

Some time ago I discussed the height of my backscenes, now this was from the perspective of taking photos without having buildings or trees, etc. ending up with the garage wall behind them. Getting rid of those bricks and cutting around the trees can be an effort in Photoshop.
I was trying to make the decision about making the backscenes higher and was tossing up just how high.
I originally made the backscenes 14" (400mm) high which gave three strips out of an 8' x 4' (2400 x 1200mm) sheet of masonite allowing 2" (50mm) to be bolted onto the layout frame. I did this as I had some backscenes from Bylong in it's previous abode and in an effort to save money as we were in a new house and there were other things to spend the dollar on.
Well, I bit the bullet and over the last three days I have installed and painted the sky on 24" high (610mm) backscenes across the front of the garage part of the layout above Bylong station.
I have not blended the joins between the sheets as I had to make the backscenes removable for layout maintenance, up with the roller doors and off with the backscenes.
Here are a few quick photos showing the effect, a much greater sense of immersion as the top of the backscene is about 7' (2100mm).


The third photo dramatically illustrates the difference in height of the old and new backscenes.
The second last photo shows that I have got to do some work on the hill scenery leaving Bylong so that the 'lower' sky doesn't intrude into the hill. I will bring the hill forward along the backscene towards Bylong  with the trees 'walking' up the new part of the hill and blending into the upper level tree line better. This will also allow me to improve the last photo by hiding the top edge of the lower backscene in this picture.
Multi-level layouts certainly give a nice long run but at the expense of some interesting challenges.
Of course I now have to replace the existing backscenes with the new high version and my hills that I painted have got to go, which leads to another painting stage, nothing like repeating your work.