Saturday, July 14, 2012

A Sometimes Useful Tool

The other Sunday my daughter and her family visited and I was given an opportunity to get out of the house while they looked after my wife Chris. I decided to go to Super Cheap Auto to get a small clamp I needed and while there I found a Mini Sand Blaster for $39.95 that needs  a 30-60 p.s.i. air supply. Now imagine an airbrush that sand blasts and I thought that here is a tool I can use. I must admit I have my fathers disease and I love to collect tools just in case I might need them.


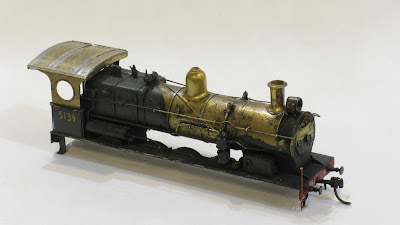
Of course you have to take it home and try it out right away but I had visitors, I got to it later that night. Some years ago I inherited some model trains from Chris' uncle and among it there was an original run Model Dockyard C38 that had been stripped of paint and a few brass parts as well after it had been left in the stripper for a number of days. It had remained in this state since then and was very tarnished.


I set up a plastic storage box as a temporary sand blasting cabinet and had a try. Now I thought that some of you would be interested and have a use for one of these so I set up my video camera of the sand blaster in action.


Unfortunately the sand blasting grit is 220 microns (0.22mm) grain size and after I was finished the video I found that the grit had flown out of the box and was everywhere for a half a metre or so. This led me to buy another storage box that had a lid that was reasonably see through and I cut a couple of hand/arm holes into it. I thought about fitting gloves like the real cabinets but figured that not much grit would escape when my arms virtually fill the holes. I also fitted a grommet into the side of the box to allow the hose to come into the box, attaching the sand blaster inside the box. A small bracket is supplied to hang the blaster on so I screwed this to the wall of the box also.
Here are a couple of photos of the 'cabinet'.


The blaster comes with a small container of the grit and I didn't see any other supply at Super Cheap Auto (I will watch for it). I would suggest that you save the used grit for re-use as I am sure that the small amount of brass, etc. wouldn't be a problem. I should mention that the nozzle has a ceramic insert.
I am interested to try this blaster on scenic elements such as ageing wood structures/parts, 'weathering' wagons and perhaps ageing signs on the side of model buildings to name a couple.
If you buy one and come up with some other uses let me know.

Monday, July 2, 2012

A little work along the way

I have been looking after my wife after her recent back operation (everything went well and she is doing OK) and having little time for modelling I reverted to a system that I have used down the years. It is simple really, just try to do maybe half an hour every second night or so and you will be amazed how much gets done. I think it is that you know you don't have much time so you focus more instead of navel gazing on "how will I do this"?
Anyway I decide to upgrade a Bergs NSWGR D50 class brass locomotive that would be about 42 years old.
Why bother do I hear you ask, when Eureka is doing the D50?
Simply because I already have one Bergs D50 (5221) which I received as a 21st birthday present and that loco is going nowhere when the Eureka 50s come along.
I upgraded my 5221 way back when David Anderson had his shop and brought in his Mansfield D50 and its brass detail castings. I also have a Mansfield D50 but I couldn't say it is a good runner, it has always had a small bind that I haven't been able to find and rectify.
I thought that I would take my time and add the same details and changes to the second Bergs D50 that I inherited a few years ago from Chris uncle.
Unfortunately I didn't have a can motor to put into this 50 as I did to 5221 several years ago so that will have to wait until I can source another (it requires one with long shafts, most have short shafts to suit diesels).
Now the Bergs 50 had several issues, one being that the cab roof was maybe 1'3" too short at the rear cab overhang, the cab roof had no detail, the marker lights were too large, some of the piping wasn't right, added some more piping and the funnel and dome were a bit small.
I was also lucky to know someone in the electro-plating industry who re-plated the driving wheels of both Bergs 50s as the brass was showing through on the treads and this caused very poor electrical pickup.
Here is the loco with the work underway.


And here it is completed with its sister D50s.


I added a Soundtraxx DRGW K37 Tsunami sound decoder and speaker in the tender like my other two 50s. The tender also had new marker lights fitted and the poor turret tender bogies that were originally fitted had been replaced with the correct ones some time ago. I do have a Lloyds Turret tender kit which I will make up some day to replace the original, or maybe I will use one of the Andian ones when they are released.
Extra pickups were added to the loco and the tender bogies as well as a wiper for the chuff using my method of ACC Super Glue applied to the rear wheel rim  of the last driving wheel to make insulated sections.
I have noticed now that it is painted that there is a circular hole in the cab side for access to the sanding gear, for filling I think, so more work to come.
One day I might try re-gearing both of the Bergs 50s to get rid of the worm gear by mounting a gearbox on the rear axle inside the firebox and then sliding the motor inside the boiler barrel but don't hold me to this.