Sunday, January 27, 2013

It always pays to keep your eyes open

Back in early November, before my prostate operation, my wife Chris was getting me to clean up the garden (she is the ganger and I am the labourer, she has the know how and a bad back). Assisting me at the time was Dave "Rowdy" Allen a modelling friend and fellow Rambler. We had been removing some old plants and I pulled up a small plant and thought that the roots looked like a tree. Now this is something I had read somewhere a number of years ago; a tree will have a root structure as big as the tree itself and the root system of a small plant could be used to make a model tree. I showed it to Rowdy and then snipped off the plant and put the root system aside, washing it later after all was done in the garden.

My operation intervened (I am getting there, just dealing with the bladder related aftermath) and during this time the roots dried out nicely.

Unfortunately I didn't take a photo of the root system before making a tree, however it did appear in the background of a photo I took of the weathered Ampol tanker I have previously posted about.


Studying the root system in the photo, long 'branches' can be seen which are proprtionally too long for a tree. I carefully trimmed these back and used the trimmings and super glued them lower down to the same or other branches to give the tree a better shape. I had to use some super glue (ACC) accelerator as it was too hard to hold the fine branches in place long enough for the glue to set.

After this I used small pieces of MiniNatur 913-21S Lombardy Poplar Foliage - Spring that I bought at the Model Railroad Craftsman at Blacktown NSW. The leaf colour is a little too green and should be more olive in colour but the only other foliage available was for a Beech tree which is much too dark for gum leaves.

I applied the foliage with super glue which was easy enough just a bit tedious.


I think that it turned out pretty well as a model of one of those gum trees that split off major trunks near the base. Unfortunately I can't tell you what type of plant it was, so keep your eyes open the next time you are doing the gardening.

Sunday, January 6, 2013

Testing the running qualities of the Eureka HUB set

I just got my 5 car Eureka HUB set and as they roll extremely well I decided to give them a running trial behind several steam locomotive models.

I tested the following:

Eureka C38
Austrains C36
Austrains C35
and Trainorama C32.

I ran the HUB set with each locomotive from my lower staging yard across the full main line to my upper staging yard.

All locomotives hauled the HUB set with ease up my 1 in 40 grades some of which are on 30" (760mm) curves.

I took a video of each climb up the last long 1 in 40 bank which has a curve right at the top end which can usually bring a locomotive to it's knees if it is overloaded.

The trains were run on DCC at speed steps ranging in the 40 - 50s of 128 possible steps so perhaps at around half power equivalent for DC (if you can really say that with DCC). Basically they were ran at a slow to medium speed to ensure that they weren't using momentum gained on the flat sections of the layout to coast up the grades.

Here is the video, you can see that each locomotive is not having any problems with hauling the HUB set. I believe that each locomotive would have handled the 7 car HUB set as well.


Thursday, January 3, 2013

Weathering Timber with Pastels

Some time ago I did a post about my installation of a Laser Rail Bits level crossing timber kit and I mentioned that I had used pastels to weather the timbers. At the time I had a request from Rod Kelly of Laser Rail Bits asking if I could do a post on my weathering method.

Although late here is how I use the pastels.

The pastels can be found in a craft or art store and may be bought as individual colours or in a set. I have one set with a range of colours in mostly earth tones and another which ranges from black through greys to white.

I chose this time to weather and build an ash filled buffer stop from the Laser Rail Bits range (recycled sleeper version).

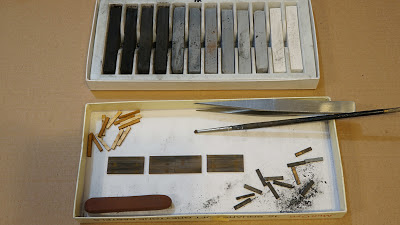
In this first photo the black/grey/white pastels can be seen along with the brush, tweezers and the laser cut and 'etched' buffer stop parts. I used the two dark greys third and fourth from the left and the lighter grey which is fifth from the left.


I find that using the pastels and the small cut off brush allows me to colour individual sleepers differently as they would be and I can also add rust stains using a red/brown pastel (lower left) to the areas where the rail sole plates were (as 'etched' onto the timbers in the kit). If a pastel is sharpened to a point or wedge shape it can also be applied directly to the individual timbers.

The sides of each piece of the timber has been burnt by the laser while cutting and doesn't take the pastel too well but is a dark colour. I use the tweezers to hold the individual pieces of timber and I rub each timber side on the pastel in a cross the grain motion which helps imbed the pastel. If the brush is used along the grain it sometines doesn't impart enough colour.

Here is the finished kit and the different sleeper colour and the faded rusty marks of the rail sole plates can be seen. The balsa base and internal 'ash' shape are not included in the kit.


And here is the ash filled buffer stop in place on the layout.


Give it a go, it's easy.