Some time ago I did a post about my installation of a Laser Rail Bits level crossing timber kit and I mentioned that I had used pastels to weather the timbers. At the time I had a request from Rod Kelly of Laser Rail Bits asking if I could do a post on my weathering method.
Although late here is how I use the pastels.
The pastels can be found in a craft or art store and may be bought as individual colours or in a set. I have one set with a range of colours in mostly earth tones and another which ranges from black through greys to white.
I chose this time to weather and build an ash filled buffer stop from the Laser Rail Bits range (recycled sleeper version).
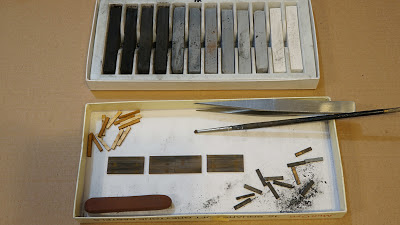
In this first photo the black/grey/white pastels can be seen along with the brush, tweezers and the laser cut and 'etched' buffer stop parts. I used the two dark greys third and fourth from the left and the lighter grey which is fifth from the left.
I find that using the pastels and the small cut off brush allows me to colour individual sleepers differently as they would be and I can also add rust stains using a red/brown pastel (lower left) to the areas where the rail sole plates were (as 'etched' onto the timbers in the kit). If a pastel is sharpened to a point or wedge shape it can also be applied directly to the individual timbers.
The sides of each piece of the timber has been burnt by the laser while cutting and doesn't take the pastel too well but is a dark colour. I use the tweezers to hold the individual pieces of timber and I rub each timber side on the pastel in a cross the grain motion which helps imbed the pastel. If the brush is used along the grain it sometines doesn't impart enough colour.
Here is the finished kit and the different sleeper colour and the faded rusty marks of the rail sole plates can be seen. The balsa base and internal 'ash' shape are not included in the kit.
And here is the ash filled buffer stop in place on the layout.
Give it a go, it's easy.
Mount Windeatt with a BAM
3 days ago


4 comments:
Ray
I have found that by wetting the laser cut timbers with a brush, helps open the paws of the wood, & while still damp rubbing the brush along the pastel sticks to get some of the pastel on the brush & then apply it to the timbers.
Also, the same people who put out the Pastels also have Charcoal & pastel pencils, the pastel pencils work much the same way as those in the trays, there is just a need to wet the tips.
Looks good.
Thanks Ray,
Even though i have a set of pastels...I gleaned the brand from your box & have a set on the way.
Yes you are correct the laser does leave the ends of the timber dark...after all the method of cutting basically cremates the timber. This blackness can be removed with a light sand or two if it causes issues.
At the end of the day a very n ice job & thanks for sharing the lesson.
Regards,
Rod Kelly
Colin
I am aware of the 'advantage' of wetting the timber however I am trying to avoid doing just that. I don't like wetting timber due to potential for warping.
I also have the colour pencils that can be wetted to produce a paint like application. I do use these for applying rust and more fine subtle weathering effects to my wagons and locomotives.
Ray P
Rod
I was very pleased with your kit and it is certainly a nice addition to the layout.
Well done Rod.
Ray P
Post a Comment