Monday, May 10, 2010

A Video of the Bylong Main Line

Here is No 83 conditional empty wheat train as it traverses almost the full length of the main line on my Bylong layout. The first 20' of line through Kerrabee wasn't good enough to post (in and out of focus, I got too close).

This gadget seems to only be 4 x 3 format so here it is on YouTube:
16 x 9 video.
The video was taken in one go as the train climbed from the lower staging yard at Muswellbrook to the upper staging at Gulgong.
Some sections have been cut out due to too much camera movement as I tried to keep up with the train. Almost all of the main line is shown except for the Cox's Gap loop and signal box, way too much movement.
If I ever build another layout then I will be aiming to have a lot more vertical space between the decks as it is difficult to take photos and videos in the current 10" or so (250mm).
One thing I have learnt is that using a video camera is an interesting challenge and good lighting is essential. To this end, I added four more low wattage flourescent lights to the lower deck under Wollar on the climb up into Bylong.
After installing the lights my HD digital video camera decided it didn't want to turn on last weekend and is in being repaired at the moment, well I am waiting for a quote anyway. It will have to be repaired as it is only 26 months old and it cost about $1400, of course it is out of warranty.
This video was taken with a small hand held Sanyo HD digital video camera shaped like a pistol so I couldn't put it down on the layout. This camera is my daughters and I did this video to try out the camera and the lighting.

Saturday, April 24, 2010

Bylong Operating Night

We held another operating session last night and all concerned felt that it went very well and that the layout operated very well which was a relief.

The layout is run to a 12 hour timetable that starts at 6:00am and concludes of course at 6:00pm. The timetable is run at a fast time rate of 6 to 1 so that 1 hour on the fast clock is 10 real minutes. This was made easy by the use of the clock facility in the NCE DCC system where the fast time is displayed on the Pro Cab throttles. Marcus Amman was also kind enough to bring along two fast clocks that plug into the cab bus and display the fast time in large red LED numbers. One clock was placed at Bylong and the other at Wollar for the Station Masters.

We ran again using NCE radio throttles as since the previous operating night a number of the Ramblers had their Pro Cabs converted to radio. There more than enough radio throttles to run the layout. The radio throttles performed flawlessly with no one complaining about delayed response or missed keystrokes.

We ran 25 trains during the session and finished the night at 6:00pm fast time one train movement behind the timetable which all agreed was pretty good, better than last time.

We didn't have a dedicated Station Master / Signalman at Bylong this time. That was my fault as I didn't ask for volunteers and we did have one instance of two trains in the section between Bylong and Cox's Gap Loop but not a cornfield meet due to that lack of control. There was one other instance when I was shunting the branch mixed in Wollar and I gave permission for a passenger train driven by Dave "Rowdy" Allen to leave Wollar down the grade to Bylong as a coal train was climbing the grade. This of course was very wrong of me as I had usurped the power of the Wollar Station Master, Layne Hardy. Layne has been the SM for the last two sessions and has done a really good job although he did say that next time he would like to run a train or two.

I will leave you with this YouTube video of 3532 on 81 Goods banked by 5085 as it passes through Bylong in preparation for the climb to Cox's Gap and Wollar. Apologies for the quality of the video but I quickly grabbed the camera and took the video without having the chance to set it up so that the focus was better. It is however interesting to listen to the discussion going on .

Sunday, April 4, 2010

Decision Made - Action Taken

Some time ago I discussed the height of my backscenes, now this was from the perspective of taking photos without having buildings or trees, etc. ending up with the garage wall behind them. Getting rid of those bricks and cutting around the trees can be an effort in Photoshop.
I was trying to make the decision about making the backscenes higher and was tossing up just how high.
I originally made the backscenes 14" (400mm) high which gave three strips out of an 8' x 4' (2400 x 1200mm) sheet of masonite allowing 2" (50mm) to be bolted onto the layout frame. I did this as I had some backscenes from Bylong in it's previous abode and in an effort to save money as we were in a new house and there were other things to spend the dollar on.
Well, I bit the bullet and over the last three days I have installed and painted the sky on 24" high (610mm) backscenes across the front of the garage part of the layout above Bylong station.
I have not blended the joins between the sheets as I had to make the backscenes removable for layout maintenance, up with the roller doors and off with the backscenes.
Here are a few quick photos showing the effect, a much greater sense of immersion as the top of the backscene is about 7' (2100mm).


The third photo dramatically illustrates the difference in height of the old and new backscenes.
The second last photo shows that I have got to do some work on the hill scenery leaving Bylong so that the 'lower' sky doesn't intrude into the hill. I will bring the hill forward along the backscene towards Bylong  with the trees 'walking' up the new part of the hill and blending into the upper level tree line better. This will also allow me to improve the last photo by hiding the top edge of the lower backscene in this picture.
Multi-level layouts certainly give a nice long run but at the expense of some interesting challenges.
Of course I now have to replace the existing backscenes with the new high version and my hills that I painted have got to go, which leads to another painting stage, nothing like repeating your work.

Monday, March 22, 2010

Solving a sometimes problem

When we are banking goods trains up the grades on Bylong the bank loco is usually a D50 with sprung buffers and no front coupler, so the load is taken on the buffers which is to allow the D50 to slowly drop away from the goods train when it has crested the grade, very prototypical.
However we occasionally have a problem when the loco buffers slip off and past the buffers on the guards van when on a curve. This of course causes no end of grief, bringing the train to a stop.
I have had an idea on how to fix this for several years now; no need to rush into things ;-)
I should mention that when the train leaves Bylong it enters a tunnel that is about 3 metres long and the track runs on a 100mm wide road bed with a 1200mm drop to the concrete floor so it is a little bit important. We have never had anything hit the floor yet, amazing how it focuses the minds of the two drivers.
I worked out that part of the reason for the buffer was problem was that I was using a Stephen Johnson LHG and although it has reasonably large turned brass passenger car buffer heads, I realised that when on a curve the longer the van the more the van end projects away from the track centre and hence the buffers on the loco.
I decided to use a shorter guards van to reduce the overhang effect and settled on three old Trax MHG vans that I had.
I cut the buffer heads off  and replaced them with large cast brass passenger car buffers from L&C. Now I know you will say "but you can't get these anymore" and I will agree however I had enough to do the three vans which should be sufficient for any operating session.
Ian Lindsay Models also used to make some with a slightly smaller head but they aren't on his web site now.
I guess this doesn't help anyone trying to do something similar but maybe Ian Lindsay Models or Ozzy (available at Casula Hobbies) could be convinced to run them again.
Anyway are here some pictures to show what I did.


First I marked the centre of each buffer head and drilled  a hole with a no. 59 drill, I then cut off the head flush with the back and drilled a slight recess with a no. 52 drill to take the thick shank of the passenger buffer. I then glued the heads in place with super glue.
A quick test revealed that it was successful and I then did the other two vans.


The buffer heads do look a little large but as they are now painted black they are not very noticeable.
The next operating session will be the acid test.

Monday, March 15, 2010

A Bit of Video Fun

When I posted the videos of our recent operating session I had used the video option on my still camera so I decided that I should have a go with my actual HD video camera.
I give you this picture to ponder before you download the YouTube video of 6037 passing the colliery junction.


Just a short post tonight so here is the video, not perfect, I need to improve the clarity but that needs more light so that I can get the f stop to f8 and there is another small issue that could have been better:
6037 passing colliery junction.
I really have to get back to some modelling, life has many interesting distractions.

Monday, March 1, 2010

Operating Night at BYLONG

Well, I have been a bit quiet lately as I had been preparing for an operating night; now how long did it take?

I started about four weeks ago by wracking my brains about what went wrong last time. We always think we will remember or at least write down those little and not so little issues don’t we?

I remembered a point at the throat into Wollar that had sprung the straight rail during the recent summer but I had already ‘fixed’ that with track spikes and superglue (I hoped). So the next thought was to rolling stock some of which had been responsible for a few derailments. I should mention that my rolling stock is a mixture of the very old and the very new so a full review was in order.

After about $100 in metal wheels and new bogies I was reasonably confident that they would not embarrass me. I took the opportunity to replace the plastic 33” wheels in a number of goods bogies with 36” ones and also found some nice 2BR Andrews bogies made by AccuRail (0103) from The Model Railroad Craftsman at Blacktown NSW. Be aware though that I cleaned Gary out but he said he would be ordering some more, ring before going there if you want some. Also realise that they come with plastic 33” wheels that need to be replaced with 36” ones (I used Walthers 36” wheels as they have plastic axles and aren’t magnetic of course).

Here is a photo of the 2BR under an On Track LLV that I will be back dating to 1965, not much to do, just adding some hand rails on the ends really.


After the re-wheeling came locomotive and layout testing and I forgot, cleaning the ‘crud’ off the rolling stock wheels, a slow process.

Two days before the big night I thought it might be a good idea to put up a ‘fence’ on the aisle side of the upper staging yard as the outside track was right next to a big drop to the concrete. So a quick trip to Bunnings procured a length of cover strip with rounded edges which was nailed to the edge and painted black to match the rest of the staging yard. The top edge comes to the floor level of the rolling stock which I felt would stop any problems.

I also set up an old video monitor with a small (tiny) video camera which I temporarily mounted at the throat of the yard so that the shorter members of the Ramblers could see which track was empty etc.

Here are a few quick and dirty videos I took during the proceedings using my digital still camera, my HD video camera having a flat battery which was inconsiderate of it!

Bylong Operating Night 2009-02-26

AD60 on 87 Goods leaving Bylong

UP Pickup arriving Bylong

UP Pickup shunting Bylong 1

UP Pickup shunting Bylong 2

Cassilis Branch Mixed arriving Wollar

I will really have to try making some videos of the layout but it is not as easy as the still shots as you can’t remove the brick wall, garage doors, etc. in the background. Bob Stack has done some very nice ones on his South Coast Rail blog that I will use for inspiration.

The layout was run to a timetable that I have been slowly developing with an NCE DCC control system. Since the NCE radio throttles have had the issues with slow button presses, etc. solved I decided that this would be a full radio throttle night and with all sound locomotives. Now I only own two radio throttles but Marcus Ammann (6 throttles) and Ron Cunningham (2 throttles) came to the rescue. In case you get the wrong idea the layout only needs about six throttles at best it just shows how helpful friends can be. I also didn’t have enough sound equipped locomotives but that was much easier with several friends bringing along theirs to complement the roster.

James McInerney brought along a D50 equipped with a Tsunami suitably adjusted for drifting, with momentum and deep throated chuffs on starting and a 49 class with a LokSound decoder also set up with momentum. These two locomotives were quickly allocated to the two pickups, one Up and one DOWN, James taking the D50 and Terry Flynn the 49, very interesting to shunt with.

Well the night went reasonably well, we did manage to finish without too many errors, only one train missed its time slot but it was the branch mixed and they always ran late. I did notice though that there was an extra light engine movement back down the grade to bank the next goods train that required it (none) and an empty express meat back to the country that wasn’t timetabled!

Regarding the layout, I only saw one derailment and the offending wagons are being checked, I suspect a too tight bogie. There may have been others but I will ask for a post mortem at our next meeting.

The best part was standing back interpreting the timetable and watching my friends enjoy themselves, all in all a great night which finished a bit before 1am.

Thursday, February 4, 2010

A Few Useful Bits

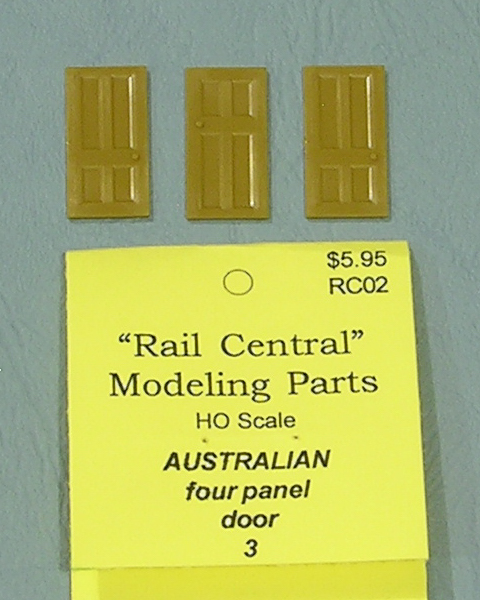
Recently I was asked by Joe Calipari to review a newly introduced range of detail parts sourced from the Rail Central Pc3 building kit. The review should be in the next AMRM but this post is to let people know that these parts exist and that they are available now.


The parts are of course suited to modelling NSWGR concrete pre-fabricated infrastructure and will be a real boon for those who are modifying the existing station buildings into the various iterations that were scattered around the state.


In my instance I have already done a double sided island platform version similar but shorter to Cumnock and Yeoval for Wollar on my layout. Pictures of Cumnock and Yeoval can be found on James McInerney’s Fotopic site.


Several of the parts are more than suitable for scratch building other Australian structures such as houses, shops, sheds, etc..


I figure that the double hung windows for would work well in a 1950’s ‘fibro’ (asbestos cement) house, the four panel doors could be hung either way up and the metal chimney can be used for a stove or a sewer breather pipe. I think that two windows or even three could be joined to form the classic front windows seen on those 50’s houses.


The goods shed sliding doors can be used for sheds, garages, rear shop doors and industrial buildings


Joe said that he would probably also release the diagonal station awning supports and he was kind enough to supply me with the extra supports I needed to complete the Wollar building.