Saturday, March 4, 2017

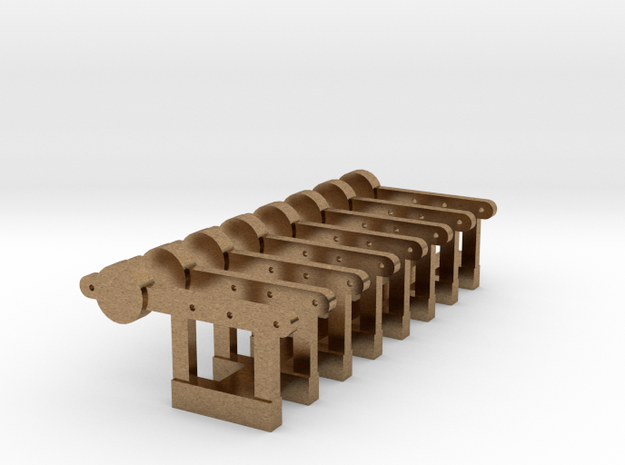
New Brass Signals added to my Signals Branch range.

I have just uploaded eleven new brass signals to my Signals Branch Shapeways shop. These signals are lost wax brass castings from 3D printed waxes. The brass signals are nicely detailed even showing the bolts that go through the post for the various signal parts.

If you click on an item in the shop you will see a larger picture of the item with a 3D icon. Clicking this icon will give a rotatable view that can be zoomed. Please note that the zoom will pixelate eventually but this doesn't represent the model.

3D printed 27 ft Signal - Front

3D printed 27 ft Signal - Rear
The tallest signals (27 foot posts) have a separate finial (pinnacle is the correct term) cast on the signal base with the other detail parts. This will need to be soldered or glued into the hole in the top of the post. The reason for this is that the tall signals with finials exceed the 3D printer maximum bounding box (print volume). Shorter posts have the finial cast in place on the post.

A jig has been designed into the signal base to bend up the critical operating rod from the counterweight lever to the signal arm.

The detail parts on the bass can be removed using a pair of transistor nippers but a cutting disc in a hobby tool could be used with care.

There are a number of holes to be drilled with a 0.4 mm drill bit for handrails and operating wires. The positions are marked by small starter holes, some of which may have cast as holes as this is on the limit of the process. If there are cast holes then these will still need to be drilled with the correct size drill bit.

The pivot hole for the signal arm is undersize because of the wall thickness design minimum for printing and needs to be reamed out with progressively larger drill bits starting with 0.7 mm and then 0.8 mm, 0.9 mm and 1.0 mm. The pivot shaft on the signal arm will need to be very lightly filed to clean it up as it may be slightly out of round. The pivot hole and shaft need to be carefully fitted for a smooth rotating fit. It might be necessary to use a 1.1mm drill bit but don't make it a sloppy fit. Being a brass on brass bearing, once the signal is painted a small drop of light oil is a good idea.

To complete this signal a White Strong and Flexible mechanism needs to be ordered and glued underneath the signal.

A ladder for the signal is also needed and a sprue of two 21 foot ladders printed in Frosted Ultra Detail acrylic material can be ordered from this Signals Branch Shapeways Shop. A sprue of 10 ladders with cast iron bases is also available. These ladders are relatively flexible so will withstand a knock.

If you wish you could instead purchase an HO etched brass ladder.

A suitable etched brass ladder and a ladder forming jig are available from Keiran Ryan Models:    http://www.krmodels.com.au/

Or from Peter Boormans Workshop:    http://peterboormansworkshop.com.au/

Also required are:

0.015" phosphor bronze wire for operating rods, handrails, etc. (Tichy Train Group have the wire - #1102 0.015" 12 straight 200mm lengths).

1 x #4 6mm screws

1 x 3mm I.D. washer

2 x 2-56 12mm screws - 4 for bracket signals (either Kadee #1709 1/2" stainless screws- preferred or #256 1/2" nylon plastic screws - come in KD5 coupler packets)

Completed Signal
These brass signals are more expensive than the HO Fine Detail Signals (Frosted Ultra Detail) but may appeal to those modellers who like brass.

I have also recently added some brass counterweight levers and brass bracket signal bellcranks at the request of a modeller who kept breaking these when bending the operating rods around the ends of the levers/bellcranks to retain them when operating. I haven't broken any when doing this however these brass versions will eliminate the issue for those who wish to use them.

Brass Bracket Signal Bellcranks

Brass Counterweight Levers
As I add more HO Fine Detail signals to the range I will also add the equivalent brass versions.

I hope you find this post of interest.

Tuesday, February 14, 2017

I have a Theory .......

For several years I have noticed that various NSWGR diesels from Trainorama and Austrains have become intermittent in their operation. This is really annoying and over the last few years I have tried several ways to improve the issue. Here is a video of my first NSWGR 44 Class running on Bylong in October 2010, no hesitation can be seen.


I first tried removing the wheel sets and cleaning the metal internal diesel bogie side plate bearing surfaces as these are coated in something black (either chemically blackened or painted). This seemed to improve matters for a couple of years but then the problem returned.

Here is an example video of the issue, the Trainorama NSWGR 44 Class has clean wheels and the track is also clean.


After the issue returned I tried graphite powder and electrically conductive grease on the square bearing blocks and internal metal bogie side plate bearing surfaces with little change, due I think to not cleaning the bearing surfaces again..

So what is my theory?

I believe that due to the sloppy contact between the axle bearing blocks and the internal metal bogie side plate bearing surface, and also running under DCC, there has been sparking due to the higher current availability of DCC that has built up a layer of oxidised material that causes the conductivity to breakdown.

I have noticed this with diesel locomotives on other DCC layouts that get a fair bit of running as well.

I think that I have found a solution but time will tell of course.

Simply put, I have installed 0.0125" phosphor bronze pickup wires that rub on the axles, this takes the sloppy fitting bearings out of the equation.

The 0.0125" phosphor bronze wire is made by Tichy Train Group and is Product No. 1106. I bought mine from the Model Railroad Craftsman at Blacktown NSW.

The following process was done on a Trainorama NSWGR 44 Class but I have also done a Trainorama NSWGR 49 Class that is easier to remove the bogie side frames.

Removing the 44 Class bogie side frames is tricky but can be done. I used a pair of long nose pliers that have smooth jaws. I had previously used long nose pliers with serrations but they don't work. The smooth faces allow the small clips on the bogie to release where as the serrated jaws hold the clips so that they can't release. Place the locomotive upside down on a soft surface. There are four sets of small clips in the bogie side frame keeper plate in small cut outs. Place the ends of the pliers jaws into the cutouts on either side and squeeze. At the same time place a small screwdriver under the end of the keeper plate and lever against the chassis coupler mounting. With luck you will get the first clips to release and then work along the clips to the other end. Once you have done it the first time it is easier to do the next bogie. Yes, this is a three handed job.

The pick up wires are made by bending an angle of about 45 degrees on the end of the 0.0125" phosphor bronze wire and trim to no more than 4 mm. Make another similar bend in the same plane 52 mm along the wire and trim again to approximately 4 mm.

Bogie and Pick Up Wire Ready to be Installed
These pick up wires then have a fine insulated wire (black decoder wire) soldered to them between the axles and the other end of the insulated wire is soldered onto the internal metal bogie side plates. The area to be soldered to on the side plate is cleaned of any blackening with a fine file to produce a nice shiny metal surface. Flux is then applied and the wire soldered on.

Fine Black Decoder Wire soldered to the Pick Up Wire and the Bogie Side Plate
Now is the time to replace any split axle gears if you have them. The split starts on the shorter side of the gear muff and can extend right through which expands the gap between the teeth where the split is and this causes the click noise when running the model.

The pick up wire is placed between the rear of the wheel and the bearing block on the axle. then it is first hooked over one of the outer end axles then under the middle axle and then over the other end axle. This over, under, over placement holds the pick up wire in place.

Pick Up Wires In Place on the Bogie
Now carefully clip the bogie side frames in place.

And here is the result, note that this is a different 44 Class that had the pick ups fitted than 4434 in the first video, it is next for the treatment.


EDIT: Please note that neither of these two locomotives are fitted with a Keep Alive. I doubt that a Keep Alive would resolve the issue as it would  become discharged with the intermittent pickup.


I have recently found some Rosin Soldering Flux at JayCar Electronics which has very little corrosive qualities so clean up is not really necessary. I have always used rosin fluxes for all my model soldering due to the lack of corrosion. Some fluxes need to be cleaned off thoroughly otherwise corrosion will set in over the years and destroy the solder joint. I find that soldering wires needs no cleanup but if I am soldering an etched brass kit then I will use some Methylated Spirits on a pipe cleaner to remove any trace of flux.

Rosin Soldering Flux


Sunday, January 22, 2017

I ordered a 'Cheap' Signal Box for my layout and also as an example for showing modellers when I have the opportunity.

This signal box was printed in Frosted Ultra Detail to see how the finish would look. As the box is made up of parallel boards and has corrugated iron on the roof at a slope I think that this gave the printers a challenge as there are fine print lines inside the box and on the rear wall at about 45 degrees. I suspect if the box was printed as it stands in the landscape then there may be print lines visible in the corrugated iron but this is not the case due I guess to the 45 degree print orientation.

I found that unusually the Frosted Ultra Detail had a slightly rough surface which I think was due to the waxy support material that is used in the printing process to support the 45 degree angle when printed. I cleaned the box in acetone then painted it without any attempt to remove the roughness to see what it would look like. It didn't look too good so I then scrapped the surface with the flat edge of a jewellers screw driver which reduced the roughness. I think that a bit of judicious smoothing with some fine wet and dry paper would also be beneficial.

Here are a couple of photos that show the roughness prior to the scraping.

Signal Box painted 'as is' showing roughness - Photo sharpened

Rear of Signal Box showing print lines - Photo sharpened
Here are a couple of photos of the box sitting on the Bylong platform just next to the dock. It does fit very nicely there but I don't think that it would be big enough to handle the signalling that I have planned for Bylong.

Signal Box after scraping with screwdriver blade


Rear of Signal Box after scraping with screwdriver blade
The signal box will be placed at the junction to the colliery at the top of the grade up to Wollar. As the box is a platform level one I will have to make a closed in supporting structure for it as it will sit on a small embankment. As most similar boxes seemed to have corrugated iron around the supports this is what I will do.

Approximate position of the 'Cheap' Signal Box at the Colliery Junction
And here is the Standard Signal Box (in White Strong and Flexible material) temporarily in place on Bylong platform (checking for fit).

Bylong Signal Box
Now I can see that I will have to get back to drawing up the various bell cranks and compensating links to go with my point rodding A Frames on my Shapeways Signals Branch shop.


Thursday, December 29, 2016

Signal Boxes and more Signal Boxes

Sorry, I have been at it again.

I have uploaded a HO NSWR 'Cheap' Signal Box to my Signals Branch Shapeways Shop. The 'Cheap' Signal Box was exactly that, a smaller cheaper signal box than the Standard Platform Level Signal Box that I have already done. It was 10 feet square, had a plank door, no front window, a window on either end and wasn't lined inside.

The dimensions and information were sourced from the Data Sheet S3 Plan and from a plan and information in an article by James McInerney on Building Wooden Signal Boxes in the December 1986 Australian Model Railway Magazine (Issue 141 Vol.12 No. 12). The model signal box in this article was built by James and resides on my Bylong layout at Cox's Gap loop.


The walls and roof of the signal box are one piece and it is available in either White Strong and Flexible or in the Frosted Ultra Detail acrylic material.

A set of detail parts (windows, door, gutter and downpipe) needs to be ordered as well, these are in Frosted Ultra Detail.


7mm Scale NSWR Standard Platform Level Signal Box

As it seemed a logical thing to do I have also uploaded left hand and right hand door versions of the Standard Platform Level Signal Box in 7mm Scale. Perhaps someone might find it useful, they can be found in the 7mm Scale section of my shop.

The Signal box must be ordered in two parts, the walls and roof in White Strong and Flexible material and the Detail Parts also in White Strong and Flexible material. The Frosted Ultra Detail acrylic material is way too expensive for 7mmScale.


The above 3D render has a paneled door but the more standard door with the window is included in the detail parts.


N Scale NSWR Standard Platform Level Signal Box

While I was 'on a roll' I did the Standard Platform Level Signal Box for N Scale and both walls/roof and the detail parts are in Frosted Extreme Detail. These can be found in the N Scale - Other section of my shop.

Frosted Extreme Detail is the same acrylic material but the layer thickness printed is 16 microns compared to 29 microns for Frosted Ultra Detail ( one micron is 1/1000th of a millimeter).

Tuesday, December 20, 2016

Merry Christmas and Happy New Year

Christine and I would like to take this opportunity to wish everyone a "Merry Christmas and a Happy New Year".


I would also like to give a big thank you to those modellers who bought items from my Signals branch shop over the past year and particularly during the recent 25% off sale from Shapeways.

Once again I am going to post about my recent 3D printing efforts and I hope that this isn't too annoying or boring. I will try to return soon to more posts about my Bylong layout and the related things that I have been doing.

Here are the most recent additions:

NSWGR Platform Level Signal Box
Platform Level Signal Box
NOTE: Camera lens distortion evident here, it is not the signal box
This is a rusticated weatherboard platform level signal box 17 feet 8 inches long that has been designed based on the signal box once at Kankool. The Greg Edwards S3 Data Sheet was used for dimensions along with photographs of Kankool signal box. The door of this signal box is at the left hand end as per Kankool.

Platform Level Signal Box 3D Printed Parts
A set of detail parts in Frosted Ultra Detail acrylic material is required to complete this signal box. Included in the detail parts are two different doors, windows, water tank, downpipe, gutter and a timber beam fitted with 8 electrical insulators.

Signal Box Left Hand Door Detail Set
There is a Left Hand Detail Set with the correct left hand doors, it is about where the hinges and door knobs are and that the door would be hinged on the end wall.

The walls and roof are one piece in the White Strong and Flexible (WSF) material that has a fine 'sandy' surface that needs to be sprayed with several coats of Auto Primer Filler or Auto Spray Putty and then rubbed back with about 1500 grit Wet and Dry paper to smooth the surface. It is up to the modeller to sand between coats or after several coats. Be careful not to sand the any detail away, particularly the corrugations in the roof. The corrugations could be brushed along their length while the paint is wet to stop the corrugations from filling with paint.

There is also walls and roof available in Frosted Ultra Detail which only needs to be rinsed in some acetone for a couple of minutes prior to painting. This is to remove any last traces of the waxy support material from the printing process.

Paint with the final colours either in the NSWGR 'Stone' colour scheme or the later pastel colour scheme (usually pale green blue or cream with white trim).

Please note that the model pictured is the WSF version and it has only has one coat of primer followed by the final colours to depict a perhaps more 'normally' finished model and not the multiple coats of primer and rubbing back to smooth the surface that some modellers may do.

The signal box is also available with the door at the right hand end and a right hand set of details parts are available for this signal box.

A pair of small water tanks with downpipes from this detail set is also available separately.
Small Water Tanks from Signal Box Detail Parts
Early NSWGR Rivetted Water Tank
Rivetted Water Tank front view

Rivetted Water Tank showing bolted flanges on inside.
The rivetted water tank consists of the four water tank sides printed as one piece. The interior flanges and bolts have been included in the print.

A ledge has been printed inside the tank for a 3mm thick floor, layers of polystyrene or 3mm MDF would be suitable. Measure the underside of the tank for the floor, it should be 88.5mm x 88.5mm.

The tank is printed in the White Strong and Flexible (WSF) material which has a fine 'sandy' surface that needs to be sprayed with several coats of Auto Primer Filler or Auto Spray Putty and then rubbed back with about 1500 grit Wet and Dry paper to smooth the surface. It is up to the modeller to sand the flat areas between coats or after several coats. Be careful not to sand the rivets.

The water tank pictured is sitting on a Laser Rail Bits timber stand kit. An alternative would be the Models 'N More version.

Please note that the model pictured has only has one coat of primer followed by the final colours to depict a perhaps more 'normally' finished model and not the multiple coats of primer and rubbing back to smooth the surface that some modellers may do.

Recently released is a steam dome for the Eureka Models NSWGR D50 Class steam locomotive along with a Eureka Models replacement D50 funnel and dome set.
Eureka Models NSWGR D50 Funnel and Steam Dome set
Also recently released are NSWGR C32 and Standard Goods (D50, D53 and D55 Class) funnels and steam dome sets with 1/8th inch mounting pegs that can be used to upgrade a DJH model locomotive or perhaps an early brass model.

These have been released in both HO and 7mm Scale.
C32 Funnel and Steam Dome - Standard means HO 1/8 inch and 7 mm Scale 1/4 inch mounting peg

Standard Goods (D50, D53 and D55 Class) Funnel and Steam Dome set

The detail advantage of the 3D printed funnels is that they have the bolts on the flange holding the funnel to the smokebox of the locomotive. It is not possible to have the bolt heads on injection moulded funnels as the funnel would not be able to be removed from the moulding die. The only other way to get the bolts on the model funnel is to split the funnel into two parts as per the Ixion C32 which then leaves a fine groove/line at the join.

Lastly for those who model in N Scale (1:160) I have C32 and D50 funnel and steam dome sets available.
N Scale C32 Funnel and Dome set

N Scale Standard Goods (D50, D53 and D55 Class) Funnel and Dome set


Saturday, November 19, 2016

Armidale Convention and a Shift in Time

Christine and I have just returned from our journey up to Armidale from southern Sydney.. We left on Thursday morning at 5:04 am. Why so early? Well, back in January Chris told me that she wanted a caravan so a month later it sat in our driveway. The early start was to try to clear Sydney before the peak hour really started to get going. We had a good trip up to Quirindi where we decided to stay overnight instead of pushing through to Armidale. All evening and throughout the night we heard the coal trains passing but mainly just the horn, the modern wagons are relatively quiet, boring though.

The next day we stopped in Werris Creek so that I could get a few photos of the supporting timbers under the sloping ends of the station awnings. I have taken photos of the station building several times over the years and it is amazing how many photos you can take and still not get every thing.

As we were walking to a coffee shop we ran into Ian Black and Chris Sim so we had an enjoyable couple of hours chatting over coffee and photographing the station. We went into the museum and were invited upstairs to see the HO layout based on Werris Creek that is being built. It is virtually finished but with the station buildings still to be made.


Later that afternoon we made it to Armidale and I went to the Friday night registration as Chris was very tired and elected to stay in the van. I managed to catch up with Dave and Maureen Heap and had an enjoyable meal with them in the Bowling Club Bistro.

The convention was very enjoyable and I had many chats with friends old and new. I won't name names as there are too many and I might miss someone.

Rohan Fergusson had his newest railway module there as a large diorama along with several models, an amazing very large bulk wheat model and a really nice Queensland style pub. Here is a link to Rohan's blog and the bulk wheat model.

Here is Rohan's layout module, photos taken at last years Coffs Harbour Convention.


And here is Rohan's pub model.


Also there was an On3 old town diorama and and N Scale diorama of Moffat Tunnel of the D&RGW railroad. Moffat Tunnel is a famous railroad and water tunnel that cuts through the Continental Divide in north-central Colorado USA.


There were some layout visits that I could have attended but I was too busy talking and 'missed the bus' so to speak. I particularly wanted to see the Great Northern Railway layout which was modelled on the GNR in the New England area.

One aspect of the convention is a sort of requirement to bring a model along but given the numbers attending and the models on display there were more than a few who didn't bring a model. That isn't a complaint just an observation. The models displayed were interesting but unfortunately I didn't think to take any photos of them. I displayed my latest Fettlers Cottage pilot model along with my working Fine Detail signal diorama, a Distant signal in WSF and the latest Fine Detail Distant signal in FUD as a comparison. I also displayed the part completed Werris Creek platform bracket starting signal.

Laurie McLean had his diorama with On3 working figures and animals all run with tiny geared motors and cams, amazing work. There were other clinics on DCC, JMRI Decoder Pro, servos and trestle building.  Wagon weathering with Ian Millard, point building with Andrew Campbell and of course the irrepressible Keiran Ryan was there showing and working on his 7mm products.

Commercials were represented by Warren Herbert's Gwyder Valley Models, Joe Callpari's Casula Hobbies, Peter Boorman's N Scale and HO etched brass kits and Keiran Ryan Models.

I managed to spend more on the weekend than I have in quite a few years.

I have been pondering all year about which version of the Casula Hobbies R Car Sets to get and finally came down to the Tuscan and Russet 5 car set. Now, by 1965 (my modelling year) the R Cars were in Indian Red with single yellow line, so what happened?

I have decided that I will have two eras, 1965 and perhaps 1955 - 1960. I have been working up to this for a while now and thought I may as well take the plunge as I liked the Tuscan and Russet so much.

The earlier era will allow me to run my two D57s in the right time period. D57s on the Sandy Hollow to Gulgong line you say? Yes, you see since I am modifying history I decided that the line was upgraded to allow heavy trains like W44 to avoid going over the Blue Mountains, into Sydney and out again to cross the Hawkesbury River and into Newcastle. the only trouble with W44 is that I don't have the appropriate wagons, oh well, one step at a time.

As part of this move, I have bought a Bergs brass C35 which may replace my two Austrains C35s that I have modified to fit the 1965 era. The difference between the two times is that by the mid-1960s the C35s had a section of valance removed above the crosshead, no doubt to simplify access for maintenance. My two Austrains C35s have had this section of valance removed and they have also been re-numbered to two locomotives running at the end of 1965 still with original tenders, numbers 3520 and 3532.

One of the highlights of the convention is the Saturday night dinner with an after dinner speaker. he speaker this time was supposed to be Tim Fisher but unfortunately he couldn't attend at the last minute as he was in Melbourne for Remembrance Day and got held up. Tim's replacement was Senator John Williams who acquitted himself well giving a talk about his childhood railway reminiscences and his several Anzac day trips to Hellfire Pass on the Thailand - Burma Railway.

For me the weekend was more about the social contact with other modellers than it was about the various sessions and I spent the whole weekend mostly just talking and spending. There were quite a few ladies present at the convention and a tour of the nearby Saumarez mansion was arranged on the Sunday and at least 15 of the ladies went along. Chris said it was just amazing as the mansion had been kept as it was in the Edwardian era by the last surviving family member. Rooms were even kept as they were when various family members passed away, so the mansion slowly became a museum. It was handed over by the more distant family members to the National Trust in 1985-86.

Christine and I will definitely be returning in two years time for the next Armidale convention and I encourage those who haven't yet attended to make sure you go as it is an enjoyable few days away, a sort of model railway holiday.

Wednesday, November 2, 2016

NSWGR Fettlers Cottage HO Model for Cassilis

I have been working on a 3D print of a NSWGR Fettlers Cottage for some time for my Cassilis branchline terminus station. I have had the plan for this for several years and always liked it. After doing a pilot model and amending the 3D designs I am now ready to make it available on my Shapeways Signals Branch shop. It can be found in the HO Architectural and HO Infrastructure sections of my shop.

There are three parts of the cottage that need to be ordered to complete it, two in the White Strong and Flexible material and the finer detail parts in the Frosted Ultra Detail acrylic material.

Here is a rotatable and zoomable view of the 3D model.


    NSWGR Fettlers Cottage - 1933
    by RayP1949
    on Sketchfab

The model will be about AU$145 depending on the exchange rate. I have used every trick I can to reduce the print cost short of designing it as a multi-piece 'flat pack' which can take away some of the advantage of 3D printing.

The three parts that need to be ordered are:

  • The main body of the cottage in White Strong and Flexible (WSF).
  • The roof in White Strong and Flexible.
  • The details parts in Frosted Ultra Detail (FUD) being the windows, doors, water tanks, sheet metal fireplace and the gutters.


The cottage has been modeled from NSWGR Standard Fettlers Cottage Plan S.T. 106 of 1933.


I have not been able to find any photos of these timber framed, weatherboard and fibrous cement sheeting ('Fibro') cottages so here are some images to show what I think the NSWGR 'Stone' colour scheme of the era and later into the 1960's could have been like. Of course in the early 1960's the NSWGR started to paint railway stations and associated buildings in the pastel colours.


I would be very interested in any photos of these cottages, particularly showing the colour scheme.

The only magazine article that I am aware of regarding the NSWGR 'Stone' colour scheme is in Branchline Modeller No.1 - 'STONE' COLOUR SCHEMES FOR NSWGR BUILDINGS by James McInerney.

Here are a couple of views of the HO pilot model. Do note that there have been some changes to this model. The doors are now in the FUD high resolution acrylic material and the corrugated iron in WSF on the verandah roofs and the walls of the bathroom at the rear have been modified to make the corrugations stand out better. The roof corrugations in the WSF are very good so the model orientation of the body of the cottage in the printer was obviously different from that of the roof.


The wall and verandah structure model part has supports for a floor and tabs/slots for the internal walls if the modeller wishes to add these. The floor would be .020" thick and the slots for the interior walls have been designed for 1mm thick (0.040") wall material.

I have not included downpipes from the gutters to the water tanks so that the tanks can be placed in different positions. The downpipes can be made from 1mm diameter plastic (Evergreen 211 1mm/0.040" Rod) or copper/brass wire.

Lastly, I was unable to get the small hole (for the downpipes) in the top of the water tanks to be printed as each time I uploaded my model to Shapeways it would assume that the hole needed to be fixed so the upload program closed it. If you wish to have the hole I have made a locating ring inside the top of the water tank (accessible from underneath) where you could drill through. I found it easier to use a drop of black paint on the end of a 3mm diameter piece of rod.

800 Gallon Water Tanks on Stands
I have also made available on my Shapeways Signals Branch shop the 800 gallon water tanks on stands. These come as two tanks on a sprue. This is to reduce the cost per tank as Shapeways has a base US$5 charge per item before any printing cost. Basically a single water tank would be much more expensive than the per each price when buying two on a sprue (one print item).

Corrugated Iron
Also available are sprues of corrugated iron sheets both flat and bullnose for verandahs in 10 foot lengths, 30 sheets of 8 corrugations and 30 sheets of 10 corrugations wide. These are in Frosted Ultra Detail acrylic material the only possible material. The price is relatively expensive and I am making very little on these. I have made them available as someone might want to use them, particularly the bullnose as it is very difficult to make with the usual model corrugated materials.